 |
| Photo courtesy of sprinklebakes.com |
This book is more than just a cookbook. It is a crash course in art fundamentals. Each recipe in this is a component of an edible art piece, and the more basics you master, the more you can create! I am so inspired by this book. I can't even explain.
So I'll just have to show you!
Can you even believe this is dessert? Kind of puts the sushi candy kit to shame. Kind of, I mean, I still love the kit, too, but this is way more gorgeous and elegant! Not to mention delicious.
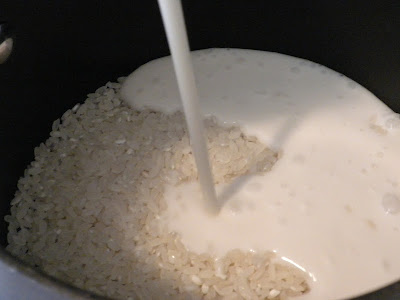
The first step to this masterpiece was cooking up some sushi rice. I used Calrose rice, since that's what my local market happened to have, but any medium grain sushi rice will work well. You cook it up much like any regular rice, adding liquid and seasoning and bringing it to a boil, then covering it and letting it simmer for 20 minutes.
The twist here is the rice is cooked not in water or broth - but in coconut milk and sugar. I've never made a rice-based dessert in my life so this was a real adventure.
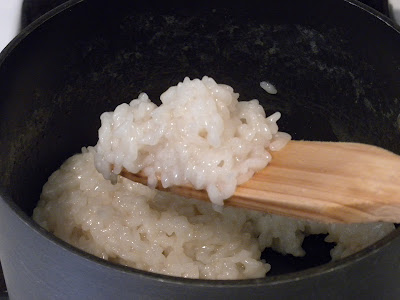
Once the rice is all cooked, it'll look a bit like this. Most of the liquid should be cooked away.
Once your coconut syrup is nice and, well, syrupy, pour it over your cooked rice and continue to cook over medium heat until the mixture is thick and sticky, then put it aside to cool completely.
I didn't let mine cook down quite enough because I got nervous about how off-white my rice was and worried cooking it much longer would turn it too brown. Don't be me, folks! Let the liquid cook off! My rice was a bit too wet in the end. Oh well, live and learn!
This plastic-wrapped lump is some home-made modeling chocolate, another recipe from the Sprinkle Bakes book. This was supposed to be used as a substitute for the nori strips used to hold the topping on nigiri sushi in place, but I got a crazy idea.
If it could be used to imitate the nori on nigiri, why not use it to simulate the wrapping on hosomaki - rolled sushi?
Well, reason one - modeling chocolate is kind of difficult to roll out thinly enough. But darn it, I'm stubborn! I kneaded it with my hands until it was malleable enough to be rolled out...
...Trimmed it into a rectangle, saving the leftovers for - you know, the thing they were supposed to be used for in the first place!
Just like making regular sushi - which, by the way, I'd also never done - I spread the rice over the modeling chocolate wrapper, over top of a parchment-covered bamboo sushi mat. That thing had been sitting unused in my drawer for a donkey's age.
I julienne'd a bit of honeydew and cantaloupe for my sushi filling and rolled it up just like you would a real sushi roll... or so I hoped!
It was a tad difficult, because the chocolate was still a bit firm and didn't want to cooperate. Some of the rice squeezed out the edge, but I somehow managed to get it rolled up pretty well...
Like so. Then I used a sharp knife to slice it into individual pieces. I didn't get a good pic of those by themselves, but there's more coming so hang tight!
With the remaining rice, I formed little rectangles about the size that real nigiri sushi would be, using just a smidge less than 2 tablespoons of rice per piece. If you have a nigiri mold, by all means, use it and safe yourself some time! I don't have one, though, so I formed all the rice shapes by hand.
For the nigiri-type sushi, I needed some 'fish' for topping them. I couldn't find dried papaya like the recipe called for, so I substituted dried mango slices. I had to do some fiddling to get these to lay flat and resemble salmon, but I think I did a pretty good job:
Forgive the fuzzy pic, I really need to get a better camera or learn to focus mine better. In any case, I flattened the fruit pieces out by working them with my fingers, and used a sharp knife to trim them to size.
Just for fun, I also scored some lines onto the fruit to resemble the texture of fish.
And voila! A sweet, coconutty and fruity dessert with a hint of chocolate. I never would have thought of making something like this in a million years, I don't know where Heather gets her amazing ideas, but I hope she never stops!
In case you're wondering, I ran out of dried mango and used honeydew slices to cover some of these... I'm just going to pretend they represent avocado.
When I saw how awesome these were turning out, I was driven to dig out all of our Asian serving ware to devour them properly.
I even busted out the soy sauce server. Oh, don't worry, that's not real soy sauce, of course, but a beautiful syrupy chocolate sauce! I used the leftovers of this sauce on fruit for days afterwards. I might even make it again just to dip fruit into - it is absolutely delicious!
So uh... if no-one minds, I'm just gonna show off a bit now. I'm really proud of how this turned out!
Dipping the 'nigiri' into the 'soy sauce'... My mouth is watering looking back at this. And I don't usually even like rice and fruit desserts!
 |
| Hubby wanted everyone to see his neato samurai sword-handle chopsticks, too. |
Want to know something extra awesome? I had emailed Heather herself shortly after I got the book, asking permission to share the recipe for this with you guys. I didn't hear back, and as the weeks passed, I worried that I would have to wave these delicious photos in all your internet-faces and leave you hanging with no how-to, but with miraculous timing, Heather wrote back just this very morning and said it was fine to share the full recipe!
You guys are so lucky!
So here's how you can make your own, amazing fruit sushi!
Sweet Coconut Sushi with Chocolate "Soy" Sauce
From Sprinkle Bakes, courtesy of Heather Baird
[With comments and additions by me, in square brackets.]
Ingredients:
Sushi
1/2 Cup sushi rice, medium grain, such as Nishiki
One 14-ounce can coconut milk
1/2 Cup sugar
20 very thin strips of dried papaya, fresh [or dried] mango, or orange segments [or even honeydew melon, apparently]
5 oz modeling chocolate, rolled thin and cut into strips
"Soy" Sauce
2/3 Cup unsweetened cocoa
1 2/3 Cups sugar
1 1/4 Cups water
1 teaspoon vanilla extract
Equipment:
Nigiri-sushi mold (optional)
Make the sushi rice:
1. Combine the rice, 1 cup of the coconut milk, and 1/4 cup of sugar in a medium saucepan and bring to a boil.
2. Reduce heat to low and simmer, covered, for 20 minutes or until liquid is absorbed.
3. Remove from the heat and let cool slightly.
4. In another saucepan, boil the remaining coconut milk with the remaining 1/4 of sugar until thick and syrupy.
5. Pour the syrup over the cooled rice and cook over medium heat until thick and sticky. When it has finished cooking, there should be very little liquid remaining in the saucepan. Remove from the heat and allow the rice to cool completely.
Form the sushi:
1. When the rice cools, press spoonfuls into the nigiri-sushi mold cavities. If you aren't using a sushi mold, place dollops of rice (about 2 level tablespoons) [I used a bit less than this, perhaps a tablespoon and a half] on parchment paper and form into rectangles with your fingers. If the rice sticks to your hands, fill a small bowl with water and wet your fingertips for easier shaping.
2. Chill the shaped rice in the refrigerator for 30 minutes, or until the rice can be unmolded without sticking [or, in the case of hand-formed pieces, picked up without falling apart!]
3. Slice dried papaya makes a good faux raw salmon. Trim the papaya [or fruit topping of choice] to match the size of the rice bundles. After unmolding the rice, place the nigiri pieces on parchment and top with thinly sliced dried papaya.
4. As a substitute for nori (the seaweed used to wrap sushi), use chocolate modeling clay that has been rolled thin and cut into strips. You may also use soy sushi wrappers, which are mostly tasteless and come in a rainbow of colours. Press the ends of the chocolate strip together on the bottom side of the nigiri and serve on sushi platters with chocolate soy sauce on the side.
Make the "Soy" Sauce:
1. In a medium saucepan over medium heat, combine the cocoa, sugar and water. Bring to a boil and let bubble for 1 minute.
2. Remove from the heat and stir in the vanilla. If not using immediately, transfer to a jar and store in the refrigerator, and heat again before serving.
***
And there you have it! Yes, these sweet sushi are a bit of work, but it's fun work! And even more fun when you show these off to your friends and family and explain that they are, indeed, dessert!
So set aside a few hours one day and give these babies a go! You will not regret it. I certainly don't.
Except that, you know, a certain hubby keeps looking at me expectantly. Like he wants me to whip up another batch. Every day. I might have to go pick up some more dried mango.
In any case, thanks so much for reading, and definitely check out Heather's blog and her awesome cookbook! You definitely won't regret it, and all the staring-expectantly-significant-others in the world won't change that.
Until next time!


No comments:
Post a Comment