Showing posts with label recipe. Show all posts

Thursday, 24 May 2012

Fireworks Cupcakes: Sweet, Spicy, and Unexpected!

Besides working full-time as a charity fundraiser, I help out seasonally at a fireworks shop called Kaboom! Let me tell you, it is super-fun answering the phone and saying, "KABOOM! How can I help you?"

But maybe that's just me.

In any case, I had been batting a new flavor idea around in my head for a while and being called back to the shop for Victoria Day weekend gave me the nudge I needed to put it into action!


So I whipped up my favorite yellow cake - Bonnie Butter Cake, recipe below - and as a control batch, made 12 plain cupcakes in plain white wrappers.

Then it was time to experiment!


That, my friends, is crushed red chili flakes, which I crushed myself in my mortar and pestle. I knew I bought that thing for a reason.


Next, to be sure there'd be no confusion as to which cakes were regular and which were extra spicy, I chose bright red wrappers for the spicy half.


Then I filled the cups and baked like usual. Well, except that when I usually bake cupcakes, I don't get a faint whiff of chili from the oven, but I suppose that's to be expected.


Next I invented a very simple, Thai-flavours-inspired frosting consisting chiefly of peanut butter, icing sugar and coconut milk. My brother, Duck, happened to be assisting, and asked how I made the frosting.

"Oh, it's really easy," I said, "You just throw it all together in a bowl and -"


"... Okay, not that easy, jeez."

Actually, measure out a 1/2 cup of peanut butter and, using a hand mixer, slowly add 3 cups of icing sugar while mixing until the peanut butter is pretty evenly distributed.


Then add 1 teaspoon of vanilla and a tablespoon of coconut milk at a time, mixing on medium in between additions until a smooth frosting forms, like so:


Because of the amount of peanut butter, the frosting will have a somewhat goopy consistency. If it gets too soft to pipe, simply add a bit more icing sugar to firm it up.


The plain cupcakes were topped with pretty swirls of peanut butter coconut frosting. Of those who tried the plain cupcakes, I heard both that the coconut flavor was too strong, and that it wasn't strong enough, so I suppose you can adjust the level of coconut milk depending on your liking. Simply replace the coconut milk with regular milk when you feel you have enough coconut flavor.


The spicy cupcakes got a swirl of icing, too, but I wasn't stopping there, oh no. I mixed up a simple icing glaze.


Then I made it less simple and more sensational! Add as much sriracha sauce as you think you can handle.

Then add a little more.

Then a little more than that.

Seriously. I thought I had made mine too hot until I put it on the cupcakes and tried it. The frosting's richness really brings the heat level down, so feel free to go a little nuts with the hot sauce!


You could stop here, but I felt the glaze looked kind of pale-orange-beige and I really wanted it to visually scream: WARNING! SPICINESS AHEAD! So I threw in a bit of red food colour, with a smidge of brown to try to approximate the colour of the sriracha sauce.


Now that says hot! I dipped a spoon into the glaze and simply drizzled it over the top of the cupcake, like so:


Feel free to adjust the amount of the glaze to your own liking. Heat levels are a very subjective thing... 'not hot enough' to me might be equivalent to 'oh god my eyeballs are melting!' to you, so be sure to keep that in mind.


So I packed up the spicy Fireworks and took them to the fireworks store. I also brought the plainer ones in case of non-spice fans. And you know what?

Most of the staff was afraid to try them!

Seriously, guys? Seriously? You're okay to work in a building full of explosives, but a little hot sauce on your cupcake freaks you out? Come on.

The manager was brave enough to try one. Then he was brave enough to try a second, so I'll take that as a good review. Hubby devoured a couple himself and I certainly had my share!

Hubby took what was left to his workplace the next night, and they pretty much disappeared, all reviews were positive - unless hubby just didn't want to hurt my feelings - but seeing as the trays returned very nearly empty, I'm inclined to believe the overnight staff at the fast food restaurant truly did enjoy these!

Of course, these are the same guys who sneak bacon into their ice cream treats, so... take that as you will.
On another note, these cupcakes were featured on My Food Looks Funny (and before you get upset about the caption, know that I wrote it, poking fun at my own creation!) so definitely go check out the other funky treats and oddities over there.

Want to make your own? Here's all the required recipes:

Bonnie Butter Cake
Another one adapted out of the ol' Betty Crocker book

2/3 Cups Butter, salted
1 3/4 Cups Sugar
2 Large Eggs
1 1/2 tsp Vanilla
2 3/4 Cups Cake or Pastry Flour
2 1/2 tsp Baking Powder
1 tsp Salt
1 1/4 Cups Milk
1 tsp Red Chili Flakes, crushed (if making fireworks cupcakes, optional. Add more if you're a real heat fan!)

Mix butter, sugar eggs and vanilla until fluffy.  Beat 5 minutes on high speed with hand- (or stand-) mixer, scraping sides down occasionally. In separate bowl, combine flour, baking powder, chili flakes (if using) and salt. Reduce mixer speed to low and add dry ingredients bit by bit, alternating with milk, until well combined.

Pour into lined cupcake pans and bake at 350 degrees for 17-19 minutes. Makes 24 cupcakes.

***

Peanut Butter & Coconut Frosting
From my brain, where I get most of my ideas.


1/2 Cup Peanut Butter
3 Cups Icing Sugar
1 teaspoon Vanilla
5-6 tablespoons Coconut Milk (not coconut water or beverage!)

Cream peanut butter with hand mixer on low, slowly add icing sugar until peanut butter is distributed throughout. Add vanilla, and first tablespoon of coconut milk. Be sure your bowl and mixer are very secure, due to the thickness of the frosting at this point, the bowl can try to get away from you!

The next thing you know, the mixer's out of control and spraying frosting everywhere! Not that it would ever happen to me.

Get that photo out of here!

In any case, add a tablespoon of coconut milk at a time until the frosting reaches a spreadable (but yes, it will be kind of goopy) consistency.

***

Sriracha Glaze
Only the brave need apply.

1 Cup Icing Sugar
1 tblsp Coconut Milk (or regular milk)
1 tblsp  Water
Sriracha sauce to taste. Then a bit more than that.


Food Colouring, optional

With a fork or small whisk, combine icing sugar, coconut milk, and water. Add sriracha sauce a bit at a time until desired heat level is reached. Add food colouring, if using, until desired shade is achieved.

***

So, feeling adventurous, my friends? Give these suckers a try. If you dare!

Until next time!

Thursday, 17 May 2012

Mother's Day Brunch and the Easiest Coffee Cake Ever

On Mother's Day, my husband, my brother and I all worked together to make a special brunch for my mom. I fried up some delicious peameal bacon, hubby took care of toast duty and assisted with the delicious cheddar & green onion scramble my bro Duck put together.


A lovely little plateful to be sure, but something was definitely missing... something sweet!


Coffee cake ingredients, assemble! I am willing to bet you probably have all of the ingredients for the cake base in your cupboards and fridge right this very moment. Milk, flour, sugar, salt, baking powder, an egg and your choice of butter, margarine or shortening. I was feelin' the Becel this particular day.


Like many of my favourite recipes, the directions here are basically measure & mix! Beat vigorously until smooth. Yes, you could use a hand mixer here, but frankly the whisk was closer.

Perhaps my judgement is not at its clearest before I've had breakfast. Oh well.


Next, you want to put together the topping for the cake, it's simply butter, brown sugar, cinnamon and flour. Mix until nice and crumbly. Add nuts or whatever you like at this point. Our secret ingredient?

You'll see in a couple of pictures. Gosh!


Next, grease and flour your baking pan of choice. Usually I would do this cake up in a simple 9" round pan,, but since it was a special day I thought it would be nice to give everyone their own little coffee cake.

These silicone jumbo muffin cups were the easiest thing I've ever greased & floured because they're so flexible and easy to manoeuvre.  The recipe turned out to be just enough to make 5 jumbo muffin-sized coffee cakes.


So, first, put a bit of batter in the bottom of your baking cup, then sprinkle with about a tenth of the topping.


And the 'secret ingredient' is... CHOCOLATE CHIPS! Allez cuisine!

Uh, I mean... a bit of semi-sweet chocolate chips, somewhat unexpected in a cinnamon-brown sugar topping adds a lovely richness to this cake.


Fill with more batter almost to the top, and sprinkle on some more topping.

Pop 'em in the oven at 350 degrees for about 25-27 minutes, and behold:


Oh... Yes, please!

The topping bakes up sweet and crunchy and chocolatey and melty and wonderful. And the inside?


Fluffy, light, buttery (Becel-y in this case, also good!) and streaked with more brown sugar and chocolate. Now THAT'S a brunch worth getting out of bed for.

At 3 PM.

Hey, we're not morning people.

Want to make your own?

Easiest Coffee Cake Ever
Adapted from Betty Crocker

Cake:
1 1/2 cups flour
3/4 cups sugar
2 1/2 teaspoons baking powder
3/4 teaspoon salt
1/4 cup shortening, butter or your favourite margarine
3/4 cups milk
1 large egg

Topping:
1/3 cup golden brown sugar
1/4 cup flour
1/2 teaspoon cinnamon
3 tablespoons cold butter
1/2 cup chocolate chips (or nuts, or dried fruit, or bits of fresh apple, or whatever!)

Preheat oven to 350 degrees.

For the cake, simply combine all ingredients and beat vigorously by hand for 30 seconds, or use a hand mixer on low, until smooth. Mix topping together separately until crumbly.

Grease and flour pans of choice. For 9" round cake pan, layer batter and topping as desired and bake for 27-30 minutes. For jumbo-muffin size, bake 25-27 minutes, or until golden brown on top. For regular muffin size, 18-21 minutes.

Now that I listed those different variations for the 'secret ingredient' I have all kinds of ideas circulating in my head... When is Father's Day again?

Until next time!

Thursday, 3 May 2012

Pecan Pie from Scratch

So, once upon a time I promised to bake something super awesome for my husband, and then I got caught up in life and work and such and never actually got around to doing so.

The more time passed, the more awesome I thought the baked good would have to be to make up for the wait. The problem there is, by the time 3 weeks had gone by, I was convinced that only a home-made pecan pie would be enough. And I have never made pecan pie. Heck, I've never successfully made a pie crust.

So I spent a few hours tracking down the most reliable, fool-proof recipe I could find, and I finally settled on this recipe from Food Network. Tested and approved by the Food Network kitchens! So, probably I can't screw it up.

Probably.


One of the things I liked about this recipe was that I had the option of using a food processor. In the past, I've tended to overwork my pastry, or get it too warm in my hands, melting all the butter and making it too tough, so I hoped the food processor would alleviate some of that. 

As per the instructions, I pulsed together the flour, sugar and salt, then added the butter and pulsed it together until I got this:


The pieces of butter are supposed to be 'bean-sized'. I'm sure there's some bean out there that's this size? I kind of wish it had been more specific...


Next, I added a lightly beaten egg to the mix, and pulsed again until it looked like this:


And since the instructions clearly state to not actually let it form a dough in the processor, I had to at this point pour it out onto the counter and form it together by hand.

With my hot, hot hands. I tried my best not to melt all the butter.


Once it formed a dough I shaped it down into a disc, wrapped it up in plastic wrap and chilled it for over an hour. Well over an hour, in fact, since I didn't have the energy to finish the pie that evening, so the dough chilled overnight.


The next day, when I had again worked up the courage to work on the pie, I took out my dough disc and attempted to roll it out in a large circle.


Again... 'attempted'. It kind of came out a big lumpy square. I tried to make the best of it. And you know, once I had it in the pan and did my best imitation of fluting the sides, it actually looked a lot like a pie shell!


Yaaaay! I had not yet realised my fatal error. Can you see it, kids at home?

(Sorry, too many cartoons again.)


So, I lined this decent-looking-to-me pie crust with foil and weighed it down with dried beans to do the first round of baking. The beans are so the pie crust won't shift around or bubble up too much during baking.

So, while that's doing that, it's time to make the filling.


That, my friends, it brown sugar, a ridiculous amount of butter, a bit of salt, and a stream of corn syrup gettin' together in a medium sauce pan. You have to stir this, constantly, over medium heat, for however long it takes to reach a boil, then boil it for about a minute.


Then you'll have something that looks a bit like this.  Then, you want to stir in your pecans, and a bit of each of these guys:


These two are going to be BFFFs, I can just tell (that's Best Flavor Friends Forever, by the way.) I'd never in my life bought or tasted bourbon before this, and I still haven't tasted it straight up but I gotta say, the scent of this Maker's Mark stuff is just amazing. And such a pretty bottle... I didn't even want to open it! But, alas, we must make sacrifices in this life.


Once that's cooled for 5 minutes or so, you can beat in your eggs, and then voila! You have pie filling. It was actually much easier than the crust part!

Speaking of crust...


So you see the fatal error yet? When it came out of its par-baking oven stay and I removed the foil and beans, it was obvious that I'd distributed the crust unevenly. On one side there was a big crusty overhang, on the other, the crust had shrunk back from the side and was lower than the edge of the pan!

Uh-oh.

Well, I had no choice but to forge ahead, so I poured as much of the filling in as my lopsided crust would hold, and baked according to the instructions.


I even pulled the pie out halfway through to add a protective layer of foil to the outer crust.


And... this is the finished product. That lopsided crust is really, painfully obvious now. Urgh. Also, my oven is not as fancy as the sophisticated Food Network kitchens' must be, so maybe I should have taken the pie out a little earlier than instructed. The top of the filling got a bit too crunchy, and the crust came out a little dry.

Well, it was my first attempt at this variety of pie, and really, it wasn't a total loss. The best solution to a dry crust is, of course, a healthy scoop of vanilla ice cream!


Heck, even if your crust comes out perfect, put some ice cream on that. It really helps to balance the incredible richness of the pie filling. By the way, you don't really taste the bourbon in this, but you can detect a certain aromatic sharpness to the pie that really brings out the flavors of the pecans.

Would I attempt to make this pie again?

Totally. Would I steel myself up and make the crust from scratch again?

...

Maybe. Maybe if I sample some of the bourbon first.

I don't know what my next baking adventure will be, but I'll post whatever it is next Thursday, so stay tuned!

Until then!

Monday, 30 April 2012

Bonus Monday Post: Flower Pot Cupcakes!

So, many of you have already seen the Flower Pot Cake I made last week. Well, after that, I had a bit of terracotta coloured fondant left. And some purple, and pink, and green.

What to do with all this leftover fondant?

Why, make mini versions of the same cake, of course!


Want to hear the easiest cake recipe ever? This is black midnight cake, straight out of that old Betty Crocker cookbook we inherited from my Great Grandma. The instructions, I swear to goodness, are pile all the ingredients into a bowl, and mix it. Seriously, that is about it.


Mix it for 30 seconds on low, then 3 minutes on high. Then you're ready to put it in your pans and bake up. Easiest. Thing. Ever. About as easy as using a mix! These cupcakes do come out a little crumbly, and they don't dome prettily like some recipes, but they taste so good and come together so easily that you won't even mind.

EDIT: I learned something cool! If you use pastry/cake flour instead of just all-purpose flour in these, they DO dome up prettily. Give it a try!


I portioned the batter into two cupcake pans, one with liners and the other greased, and baked each for 20 minutes.

Now, I didn't take pictures of what I'm about to describe, because I was simply too full of rage. So full of rage. The cupcakes that were in the greased pan didn't want to leave the pan. I swear, that can of generic brand pan spray is going right in the garbage.

Yes, I know greasing and flouring is always better than spraying. I know that, but also I am lazy. And greasing and flouring takes longer. So, yeah, had some trouble with those ones. In any case, we did get a few out of the pan intact enough for my decorating plan.


 I took the leftover terracotta fondant, rolled it out a little thicker than I wanted it, and used a large glass to get a rough circle. You see, I didn't have my 8,000 circular cookie/biscuit cutters with me because the decorating portion of this adventure took place at my Mom's place.

Hubby works nights, you see, so when I want to bake not-at-2-in-the-morning, I sometimes commandeer my mother's kitchen. Anyway, back to the fondant thing.


So cut the circle out of the fondant and then roll it out a little bigger and thinner until it's enough to cover the bottom and sides of your cupcake, like so:


The fondant's being held on by a thin, thin layer of chocolate buttercream. Just smooth it on with your clean, dry hands (this does take a bit of practise, on my first attempt the top edge tore!) then trim away the excess, and you'll have something that looks like this:


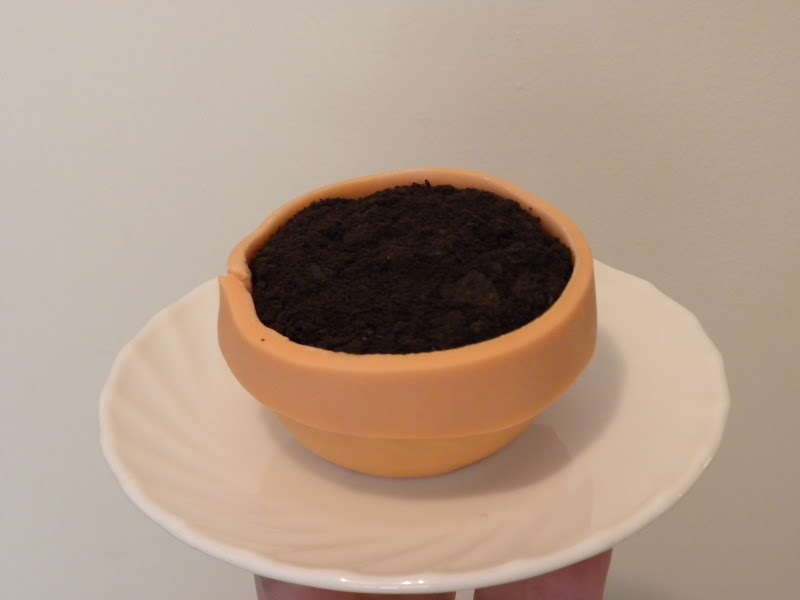
Now, spread a generous layer of chocolate frosting over the top, and cover that baby with Oreo crumbs.


Awwwwww yeeeeeeahhhhh. Just roll the frosted top about in your cookie crumb of choice until well coated. Hold the fondant sides very gently so as not to dent the smooth finish.


Once you have your cookie layer secured, take a small strip of fondant and use just a bit of water as glue to adhere it around the top of your cupcake, sticking fondant to fondant.

Remember the flowers we made for the cake? One fits perfectly in this little pot.


You can tell I was at my Mom's place, because that right there? That's actual daylight. I don't get that in my little basement apartment. It was such a gorgeous, bright day, I just had to take some shots out on the deck.

Oh, also, the cupcake looks really cute. I guess that's important, too.

...

*CRASH*

Oh no. Oh, jeez! Who dropped a flower pot?


Aw, and that was one of the flowers Mom made, too! Maaaaaaaaaaaan.

Of course, this is actually a purposeful disaster. I was unwilling to simply give up on some of the broken cupcakes that had stuck in the pan, so I trimmed up the bottom of one such cupcake to sit level, and turned it into a 'broken' flower pot cupcake. I covered the up-facing side with terracotta fondant, and then added cracks in it (see the chip out of the top?) and broken shards around.

I used the bit of cupcake I trimmed off and some frosting and Oreo crumbs for the spilled soil, and stuck the flower on with a bit more frosting, sliding halfway out of the broken pot, of course.

This guy was actually my favourite out of all the cupcakes my Mom and I decorated today.


Just look at that. Looks just like a busted flower pot. Not... not that I've broken a lot of them or anything. That was totally my little brother who broke the plant. Or, uh, the cat. Not me.

We also decorated a bunch of the cupcakes more traditionally, with swirls of frosting and royal icing flowers and such, but I really had to showcase the little flower pots. Who said leftovers can't be fun?


I found out today that decorating cupcakes is extra fun when you have someone to do it with. I wonder if you can tell which cupcakes I did and which my Mom helped with? (I'm not telling. Except, uh, the one covered in flower centers? Yeah, that wasn't me. Those are for the centers of flowers, Mom!!)

It was a super fun to have a little cupcake decorating party though... maybe someday soon I'll have a friend over to my place to help out with another project. Any volunteers?

In the meantime, if you want to try these yourself, here's the recipes:

Black Midnight Cake
From ancient Betty Crocker Cookbook, which I hopefully won't get sued for sharing?

2 1/4 cups flour
1 2/3 cups sugar
2/3 cups cocoa powder
1 1/4 tsp baking soda
1 tsp salt
1/4 tsp baking powder
1 1/4 cup water
3/4 cup shortening
2 large eggs
1 tsp vanilla

Pile all ingredients into large mixer bowl. Use hand mixer on low for 30 seconds, scraping down the sides with a spatula as you go, then mix 3 minutes on high speed, scraping down the sides occasionally.

Portion equally among 2 cupcake pans, makes a total of 24 cupcakes. Bake at 350 degrees for 18-20 minutes.

That's it! Told you it was easy.

Almost as easy as the frosting:

Easy Chocolate Buttercream Frosting


1/2 cup butter (use salted, it's way too sweet if you use unsalted. Seriously.)
1/3 cup cocoa powder
2 cups icing sugar
1 1/2 tsp vanilla
3 + tbsp milk

With an electric mixer, combine room-temperature butter and cocoa powder until smooth. Start slow so you don't coat your kitchen in cocoa. Slowly add the 2 cups of icing sugar. Add the vanilla and milk.

From here you have to add a bit more milk, a little at a time, until you get your desired consistency. This will vary a bit depending on humidity and such, so just test it after each addition of milk until it's spreadable but not runny. Then you're good to go!

***

Until next time!