Showing posts with label chocolate frosting. Show all posts

Friday, 8 June 2012

Soft Serve Twist Ice Cream Cone Cupcakes

There is something about me you need to understand before we proceed.

I hate summer.

There, I've said it. I know, it makes no sense. Everyone loves summer - a time of fun in the sun, freedom from your studies, and getting to have super-fun mani-pedi dates with all your girlfriends so you can show off your cute nail polish in your brand new, fashionable wedge sandals.

I hate all those things.

Go ahead, judge me. I know, I'm a weirdo. But maybe you'll forgive me by the end of this post, because you know what I do love about summer? The ice cream truck! And the soft-serve ice cream that comes with it. My favourite is choco-vanilla twist with sprinkles...


Of course, this was all a big awkward segue into the fact that I felt like making ice cream cone cupcakes. Yes, those are cake! And guess what? The choco-vanilla twist goes all the way down.

If you know what I mean. Which is of course that the inside is swirled, too. What else could that even mean? Jeez, what were you thinking?


Anyway, to get the interior swirl effect, first prepare a batch each of your favourite white/yellow and chocolate cake batter, or a half-recipe, if you don't want to make 3 dozen of these! If you want my recipes, the chocolate cake is here and the yellow cake is here (uh, just omit the hot chili flakes. Yeah.)

Fill two piping bags with your batters, and tape them together near the tips so you can squeeze both bags at once. I totally got that idea from Bakerella, though I've made this type of cake before by putting 2 batters in the same bag. This was much simpler!


Carefully pipe swirls of batter into your ice cream cones. You'll notice I've stood mine in a cupcake pan for baking. When you pipe these, make sure you get right into the bottom sections so your cakes don't sink during baking.


Whatever you do, don't fill them this much! Leave about a half inch from the inner rim.


Use pie weights - or like I have, dried beans, to fill around the cones. This keeps them upright very well when they're being put into or taken out of the oven.

This picture isn't sideways. You're talking crazy.

Make at least as many mini cupcakes as you've made of the cones. You can swirl them too, if you like.

So, why did I tell you to be careful not to overfill your cones? Well, see, if they're overfilled, and they rise past the rim, they apparently can spill down the sides of the cones and make a big terrible mess.


Like that. Euugh. Luckily, they didn't all spill over, but I think we all learned a valuable lesson. Like I'm always saying, learn from my mistakes! I was able to save many of these. Others... the evidence had to be eradicated.

A dirty job, but some had to do it.


To decorate the cupcakes, once fully cooled, whip up your favourite vanilla and chocolate frostings, and cram them into the same piping bag. (By the way, my vanilla frosting is the same as the chocolate, except you omit the cocoa powder and up the icing sugar by a cup. So easy!) Try to keep them in their own half of the bag for the most part, but it's okay if they blend a bit. After all, a twist cone can be like that, too.

Yes, filling this piping bag was quite messy. But heck, messy is fun!


If your cake extends above the cone's outer rim, use a serrated knife to trim away the excess.


Pipe a little swirl of frosting on your trimmed cone cake.


Unwrap a mini cupcake, invert it, and smoosh it down on the frosting. This is kinda my favourite part. Or maybe I just like the word smoosh.

Smoosh smoosh smoosh!


It was very hard to get pics of the next step, so use the magic of imagination here. What you want to do is hold the cone in your off-hand, and wielding the piping bag in your writing hand, simply pipe a generous swirl of frosting along the outer rim of the cone cake, twisting up around the mini cupcake and culminating in a final swirl on top.

Hmm, what else?


Sprinkles!! Oh, how I love sprinkles. Especially rainbow jimmies. The best.


Mmm... if I have more excuses to make tasty fake-out treats like this, maybe this summer won't be too bad.

Hubby ate one of these on the bus on his way to work. At 10:30 PM. On a cool night. I really wish I could have been there. I hope there were double-takes.

In any case, these are super-fun to make, and messy as heck to eat, and a total party from start to finish. Highly recommended.

Ho boy, Father's Day is coming up fast, isn't it? No idea what I'm gonna do for my Dad this year. If I think of something, I'll let y'all know.

Until next time!

Monday, 30 April 2012

Bonus Monday Post: Flower Pot Cupcakes!

So, many of you have already seen the Flower Pot Cake I made last week. Well, after that, I had a bit of terracotta coloured fondant left. And some purple, and pink, and green.

What to do with all this leftover fondant?

Why, make mini versions of the same cake, of course!


Want to hear the easiest cake recipe ever? This is black midnight cake, straight out of that old Betty Crocker cookbook we inherited from my Great Grandma. The instructions, I swear to goodness, are pile all the ingredients into a bowl, and mix it. Seriously, that is about it.


Mix it for 30 seconds on low, then 3 minutes on high. Then you're ready to put it in your pans and bake up. Easiest. Thing. Ever. About as easy as using a mix! These cupcakes do come out a little crumbly, and they don't dome prettily like some recipes, but they taste so good and come together so easily that you won't even mind.

EDIT: I learned something cool! If you use pastry/cake flour instead of just all-purpose flour in these, they DO dome up prettily. Give it a try!


I portioned the batter into two cupcake pans, one with liners and the other greased, and baked each for 20 minutes.

Now, I didn't take pictures of what I'm about to describe, because I was simply too full of rage. So full of rage. The cupcakes that were in the greased pan didn't want to leave the pan. I swear, that can of generic brand pan spray is going right in the garbage.

Yes, I know greasing and flouring is always better than spraying. I know that, but also I am lazy. And greasing and flouring takes longer. So, yeah, had some trouble with those ones. In any case, we did get a few out of the pan intact enough for my decorating plan.


 I took the leftover terracotta fondant, rolled it out a little thicker than I wanted it, and used a large glass to get a rough circle. You see, I didn't have my 8,000 circular cookie/biscuit cutters with me because the decorating portion of this adventure took place at my Mom's place.

Hubby works nights, you see, so when I want to bake not-at-2-in-the-morning, I sometimes commandeer my mother's kitchen. Anyway, back to the fondant thing.


So cut the circle out of the fondant and then roll it out a little bigger and thinner until it's enough to cover the bottom and sides of your cupcake, like so:


The fondant's being held on by a thin, thin layer of chocolate buttercream. Just smooth it on with your clean, dry hands (this does take a bit of practise, on my first attempt the top edge tore!) then trim away the excess, and you'll have something that looks like this:


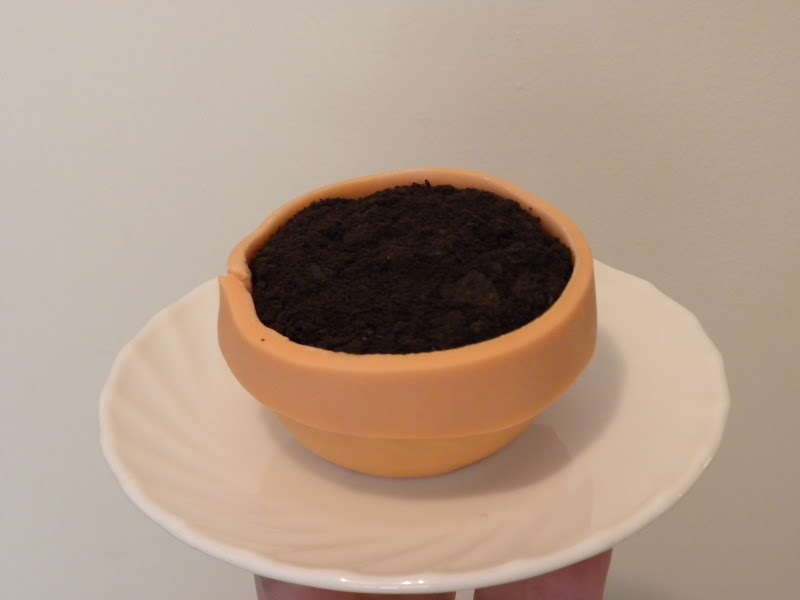
Now, spread a generous layer of chocolate frosting over the top, and cover that baby with Oreo crumbs.


Awwwwww yeeeeeeahhhhh. Just roll the frosted top about in your cookie crumb of choice until well coated. Hold the fondant sides very gently so as not to dent the smooth finish.


Once you have your cookie layer secured, take a small strip of fondant and use just a bit of water as glue to adhere it around the top of your cupcake, sticking fondant to fondant.

Remember the flowers we made for the cake? One fits perfectly in this little pot.


You can tell I was at my Mom's place, because that right there? That's actual daylight. I don't get that in my little basement apartment. It was such a gorgeous, bright day, I just had to take some shots out on the deck.

Oh, also, the cupcake looks really cute. I guess that's important, too.

...

*CRASH*

Oh no. Oh, jeez! Who dropped a flower pot?


Aw, and that was one of the flowers Mom made, too! Maaaaaaaaaaaan.

Of course, this is actually a purposeful disaster. I was unwilling to simply give up on some of the broken cupcakes that had stuck in the pan, so I trimmed up the bottom of one such cupcake to sit level, and turned it into a 'broken' flower pot cupcake. I covered the up-facing side with terracotta fondant, and then added cracks in it (see the chip out of the top?) and broken shards around.

I used the bit of cupcake I trimmed off and some frosting and Oreo crumbs for the spilled soil, and stuck the flower on with a bit more frosting, sliding halfway out of the broken pot, of course.

This guy was actually my favourite out of all the cupcakes my Mom and I decorated today.


Just look at that. Looks just like a busted flower pot. Not... not that I've broken a lot of them or anything. That was totally my little brother who broke the plant. Or, uh, the cat. Not me.

We also decorated a bunch of the cupcakes more traditionally, with swirls of frosting and royal icing flowers and such, but I really had to showcase the little flower pots. Who said leftovers can't be fun?


I found out today that decorating cupcakes is extra fun when you have someone to do it with. I wonder if you can tell which cupcakes I did and which my Mom helped with? (I'm not telling. Except, uh, the one covered in flower centers? Yeah, that wasn't me. Those are for the centers of flowers, Mom!!)

It was a super fun to have a little cupcake decorating party though... maybe someday soon I'll have a friend over to my place to help out with another project. Any volunteers?

In the meantime, if you want to try these yourself, here's the recipes:

Black Midnight Cake
From ancient Betty Crocker Cookbook, which I hopefully won't get sued for sharing?

2 1/4 cups flour
1 2/3 cups sugar
2/3 cups cocoa powder
1 1/4 tsp baking soda
1 tsp salt
1/4 tsp baking powder
1 1/4 cup water
3/4 cup shortening
2 large eggs
1 tsp vanilla

Pile all ingredients into large mixer bowl. Use hand mixer on low for 30 seconds, scraping down the sides with a spatula as you go, then mix 3 minutes on high speed, scraping down the sides occasionally.

Portion equally among 2 cupcake pans, makes a total of 24 cupcakes. Bake at 350 degrees for 18-20 minutes.

That's it! Told you it was easy.

Almost as easy as the frosting:

Easy Chocolate Buttercream Frosting


1/2 cup butter (use salted, it's way too sweet if you use unsalted. Seriously.)
1/3 cup cocoa powder
2 cups icing sugar
1 1/2 tsp vanilla
3 + tbsp milk

With an electric mixer, combine room-temperature butter and cocoa powder until smooth. Start slow so you don't coat your kitchen in cocoa. Slowly add the 2 cups of icing sugar. Add the vanilla and milk.

From here you have to add a bit more milk, a little at a time, until you get your desired consistency. This will vary a bit depending on humidity and such, so just test it after each addition of milk until it's spreadable but not runny. Then you're good to go!

***

Until next time!

Saturday, 4 February 2012

Crafted in Fine Marble, Part Two: The Frostening

Hello again. If you haven't yet checked out my Crafted in Fine Marble post, please go do so now! This post will still be here when you get back.

...

Okay? You've read it? Okay great. So, now that the cakes are marbled, baked and thoroughly cooled, it is time to frost 'em up! By the way, I do mean thoroughly cooled. If these babies are the least bit warm the frosting is going to slide right off them. My cakes spent the night in the fridge so they were more than ready to go.

The bad news is I slept in that day - I was still fighting off that awful cold - and I didn't have a ton of time to decorate before people started arriving. I'm sorry to say I did rush these a bit.

I trimmed the top to be as level as possible, then set to decorating. The first challenge I had was figuring out a way to frost the bottom of the giant cupcake cake. Trying to slather it on with an offset spatula like a regular cake did not work at all. I eventually settled on using a large petal tip - one that was approximately the size of each ridge on the cupcake - and proceeded to ice like so:


So, two things I should have done differently: I should have waited until the sides were done before frosting the top. My concern was that frosting the top afterwards would mess up the sides, but doing it first meant the frosting firmed up too much before I put the top on.

Thing two, because I was rushing a bit, I wasn't totally consistent in my technique. The ridges in the above pic are pretty even, but around the rest of the cake I started getting a bit sloppy. The 'fat' part of the petal tip should always align with the raised part of the ridge so as not to accidentally fill in the gap and ruin the ridged effect. I, uh, I might have done that in a couple of spots.

Live & learn!


So once I had the bottom frosted all around, I plopped the trimmed top bit in place and realised my other mistake. I really should have tinted that middle frosting to match the top or bottom of the cake. Oops again. I did what I could to mask the white showing through.

By the way, I swear on all that is sugary that someday I am going to buy a microwave stand, and you'll know when it happens because my pictures will suddenly, magically be uncluttered!

I'm not kidding when I say I'm a Baker in the Basement, you guys, and my kitchen counter space is exceedingly limited, but you just watch. The day of the microwave stand will come.

Uh... sorry, got a little off-track there. Back to the cake!


Using a large round decorating tip, I followed the natural swirl of the cupcake top and tried to get as even a layer as I could. If it's not perfect at this point fret not.

Although, you can fret just a little if, like mine, your clock shows that guest will be arriving soon and you haven't even started decorating the second cake. Eep.


So the reason you don't have to be perfect with the first pass of top frosting is because you're going to smoosh it with a spoon a bit to even it out anyway. I wanted it to look like someone had smeared the frosting on with a giant spatula.


I think it turned out pretty okay for my very first giant cupcake! Anyone who follows my Twitter account (Follow over here, if you're interested!) probably saw me say there would be giant fondant sprinkles on this. And there would have been, except my white fondant apparently was not packaged as air-tightly as I'd thought, and it sort of dried out. And by 'sort of dried out' I mean was completely as hard as a rock. So silver dragées became the main decoration instead.

This worked out since my buddy is a big Doctor Who fan, and the Tenth Doctor once ranted about how fascinating these 'edible ball bearings' were. So she appreciated them on her cake.

Speaking of fandoms, my dear brother Duck is a great big fan of the new My Little Pony series, so I endeavoured to depict one of his favourite characters on his cake. I missed progress shots of doing the basic frosting, but I just slathered on chocolate frosting as you would for any old layer cake, and then made a rough outline of the character in the still-wet frosting with a toothpick.

Once that was done I started piping the outlines in coloured vanilla frosting, and filling with the same frosting, but thinned out a bit.


Anyone very familiar with the show should - hopefully - get an idea of who this may be already. In future, I'm going to either thin the filling frosting more, or try out frozen buttercream transferring, but that takes ages and I was on quite the tight deadline by this point, so I forged on.


I had a small amount of not-hard-as-rock red fondant that I used for the pupils, everything else here is plain ol' frosting. I did his eye highlights with just a bit of white icing on a toothpick.


Filled in all the different areas with that slightly-thinned frosting...


Until his full face emerged! This, for those who don't watch Saturday morning cartoons aimed primarily at little girls and their families, is Discord, spirit of chaos, the main villain for the first couple of episodes of the second season.


Being spirit of chaos and disharmony, I wrapped his design down the sides of the cake, because Discord has no respect for your ideas of proper cake design. Here, you see his neck, mane, and horns poking down into the lower border.

Speaking of that border, I should have known putting a Lord of Chaos on a cake wouldn't go smoothly, I wanted that border to be done with a pretty star tip. So I fitted the tip to my trusty frosting bag and squeezed to remove air pockets -


And the bag exploded everywhere! It was my last frosting bag, too, so I had no choice but to jam the rest of the chocolate frosting in a regular freezer bag, snip the tip, and squeeze on a plain border.

Discord, spirit of Chaos, everybody! Jerk.


The good news is, bland border or no, Duck loved his cake. And when we sliced into these babies, mmmmm. 


Chocolately, buttery swirls of goodness!


I wish the marbling came out just a little prettier here. I think next time I'll go with smaller blobs of batter in that first marbling step to get a finer result.


Inside the giant cupcake, though, the marbling turned out absolutely gorgeous. I couldn't be prouder of the inside of this cake! (The outside, well, I learned a lot for next time!)


And there you have it, two marbled, baked, cooled, trimmed, frosted & decorated birthday cakes, one group of full & happy birthday party-goers, and one very tired baker.

Thanks for reading, and stay tuned, I've got some Valentine's sweets planned for very, very soon!

Until next time!