Showing posts with label my little pony. Show all posts

Thursday, 5 July 2012

Cookies for Bronycon

So right away, some of you are wondering, "What's a Bronycon?" Well, this article explains it better than I could, but in short, it's a convention for guys (and gals!) who like My Little Pony: Friendship is Magic.

Yes, you read that right.

And two of those bros who love ponies happen to be my husband and my brother. So when they vowed to attend the convention, I vowed to send along a treat for them and some of their favourite fellow fans. Now if you've ever watched My Little Pony - the classic 80's series, or the new one - or bought one of the toys, you probably remember that the ponies have little symbols on their flanks that represent their talent or true calling. They're called Cutie Marks, and I thought I could make them into some Cutie Cookies!


The first order of business was to bake 3" round sugar cookies and let them cool completely. Then I made some 20-second icing - which I have never done before! - and tinted portions of it in 8 different shades representing the coat colours of the mane six ponies plus a couple of favourite side characters.

Then I simply made a large circle of icing on 6 cookies in each colour and left them to firm up and dry completely overnight. The next day, I dyed some more 20-second icing in the ponies' complementing mane colours and made a pearl border around each icing circle.


This was a 2 (or more!) step process. First, I went in with the darker blue and did dots all the way around, leaving enough space between them for dots of similar size, then let them set at least 20 minutes. Once set, I went in with the secondary colour and filled in the gaps.


For one particular cookie design, whose corresponding pony has rainbow hair, this was a 7-step process! I really, really hope the recipients of these ones liked them because my goodness they were a lot of work!


For some cookies, I started the interior decoration while the first dots were still setting, for others I started once the borders were complete. Working on 8 designs at once, I kind of bounced around from one to the next as I hit upon the right colour combinations in my icing.

Can you tell what these are?


Maybe the stems being on there will help. They're 3 cute little apples. For some reason, these are one of my favourites of the designs!


Some of the Cutie Mark designs, like this triple-diamond mark, took several steps as well. I didn't get full how-to and process pics because I just had so much to get done, but you can see here that I started with light blue diamonds, let them set a while, then went back to add the slightly-darker-blue detailing.

When all was said and done, this set of 48 cookies took over 12 hours of work! But I think it was pretty much worth it. Just look at these finished cookies...


This cookie was undoubtedly the easiest of the bunch to make. It's not totally perfect, but I wub it just the same.


Honestly, a lot of hard work went into this cookie, and I think it deserves a blue ribbon. How do you like them apples?


I'm really happy with how this cookie turned out. It makes me want to smile, smile, smile! Seriously though, this is probably the closest I got to matching one of the mane six's cutie marks.


Let's see... soft violet background? Check. Purple and pink border? Check. Magenta star burst with white accent? Check aaaaand... check! Looks like that's everything we needed to make a Twilight Sparkle cutie mark cookie. Then again, maybe we should review the checklist one more time...


This one is based on one of my brother's favourites, Rarity, so I had to make sure it turned out absolutely fabulous. The border should have been 2 distinct shades of purple, but I couldn't get it quite right! Oh, of all the worst things that could happen, this is the. Worst. Possible. Thing!

... Okay, not really. But I do wish this had come out better.
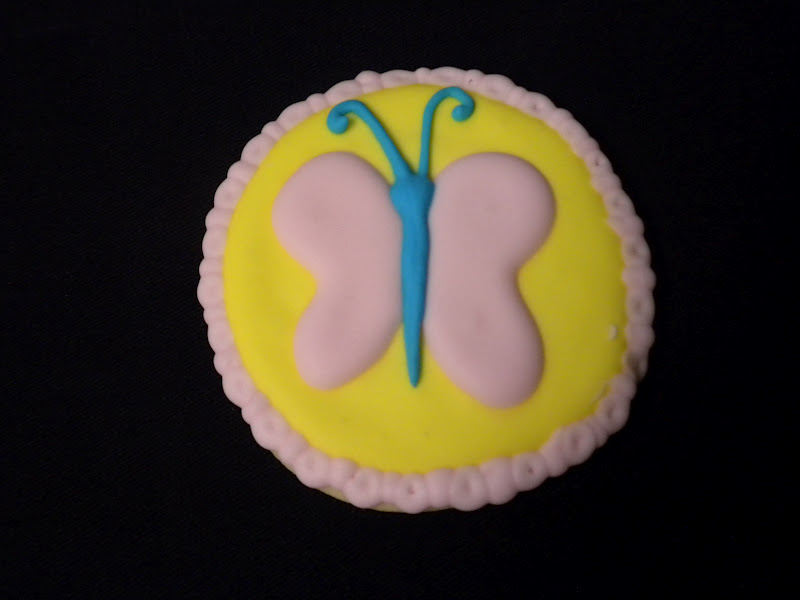

The cookies for Fluttershy didn't turn out as planned at all, there were supposed to be 3 butterflies for each cookie, but the pink icing got too runny and I foolishly tried to work with it anyway, so the wings all spread too much and the borders came out pitted. Oops...

Luckily, this one with just one butterfly turned out pretty well. Yaay! Oops, was that too loud? Sorry.


Here's another one, for a background pony who happens to be a fan favourite, but again I had trouble with the icing consistency and ended up with some pitting and running... I just don't know what went wrong!


I saved my favourite for last. This cookie represents the awesome Rainbow Dash. As I mentioned earlier, it took a lot of extra work to make this happen, but with that rainbow border it is at least 20% cooler than the others.


Altogether, I am pretty darn proud of these if I do say so myself. I think any pony fan could readily recognise who these represent.

Now if you'll excuse me, I'm actually just finishing up this post during my lunch break, so I simply must dash back to my desk. I have to make sure no-one's disturbed my pony collection that I brought in to show off today. The boys brought me back some cool trading cards and pins and...

Didn't I mention? Yeah, I'm totally a Brony too (or Pegasister if you want to be all gender-stereotypey) and now I want to make cookies for all the other background ponies, like Lyra and Bon-Bon and Carrot Top and Doctor Whooves and Mayor Mare and...

Oh, right! Back to work with me.

Until next time!

Saturday, 4 February 2012

Crafted in Fine Marble, Part Two: The Frostening

Hello again. If you haven't yet checked out my Crafted in Fine Marble post, please go do so now! This post will still be here when you get back.

...

Okay? You've read it? Okay great. So, now that the cakes are marbled, baked and thoroughly cooled, it is time to frost 'em up! By the way, I do mean thoroughly cooled. If these babies are the least bit warm the frosting is going to slide right off them. My cakes spent the night in the fridge so they were more than ready to go.

The bad news is I slept in that day - I was still fighting off that awful cold - and I didn't have a ton of time to decorate before people started arriving. I'm sorry to say I did rush these a bit.

I trimmed the top to be as level as possible, then set to decorating. The first challenge I had was figuring out a way to frost the bottom of the giant cupcake cake. Trying to slather it on with an offset spatula like a regular cake did not work at all. I eventually settled on using a large petal tip - one that was approximately the size of each ridge on the cupcake - and proceeded to ice like so:


So, two things I should have done differently: I should have waited until the sides were done before frosting the top. My concern was that frosting the top afterwards would mess up the sides, but doing it first meant the frosting firmed up too much before I put the top on.

Thing two, because I was rushing a bit, I wasn't totally consistent in my technique. The ridges in the above pic are pretty even, but around the rest of the cake I started getting a bit sloppy. The 'fat' part of the petal tip should always align with the raised part of the ridge so as not to accidentally fill in the gap and ruin the ridged effect. I, uh, I might have done that in a couple of spots.

Live & learn!


So once I had the bottom frosted all around, I plopped the trimmed top bit in place and realised my other mistake. I really should have tinted that middle frosting to match the top or bottom of the cake. Oops again. I did what I could to mask the white showing through.

By the way, I swear on all that is sugary that someday I am going to buy a microwave stand, and you'll know when it happens because my pictures will suddenly, magically be uncluttered!

I'm not kidding when I say I'm a Baker in the Basement, you guys, and my kitchen counter space is exceedingly limited, but you just watch. The day of the microwave stand will come.

Uh... sorry, got a little off-track there. Back to the cake!


Using a large round decorating tip, I followed the natural swirl of the cupcake top and tried to get as even a layer as I could. If it's not perfect at this point fret not.

Although, you can fret just a little if, like mine, your clock shows that guest will be arriving soon and you haven't even started decorating the second cake. Eep.


So the reason you don't have to be perfect with the first pass of top frosting is because you're going to smoosh it with a spoon a bit to even it out anyway. I wanted it to look like someone had smeared the frosting on with a giant spatula.


I think it turned out pretty okay for my very first giant cupcake! Anyone who follows my Twitter account (Follow over here, if you're interested!) probably saw me say there would be giant fondant sprinkles on this. And there would have been, except my white fondant apparently was not packaged as air-tightly as I'd thought, and it sort of dried out. And by 'sort of dried out' I mean was completely as hard as a rock. So silver dragées became the main decoration instead.

This worked out since my buddy is a big Doctor Who fan, and the Tenth Doctor once ranted about how fascinating these 'edible ball bearings' were. So she appreciated them on her cake.

Speaking of fandoms, my dear brother Duck is a great big fan of the new My Little Pony series, so I endeavoured to depict one of his favourite characters on his cake. I missed progress shots of doing the basic frosting, but I just slathered on chocolate frosting as you would for any old layer cake, and then made a rough outline of the character in the still-wet frosting with a toothpick.

Once that was done I started piping the outlines in coloured vanilla frosting, and filling with the same frosting, but thinned out a bit.


Anyone very familiar with the show should - hopefully - get an idea of who this may be already. In future, I'm going to either thin the filling frosting more, or try out frozen buttercream transferring, but that takes ages and I was on quite the tight deadline by this point, so I forged on.


I had a small amount of not-hard-as-rock red fondant that I used for the pupils, everything else here is plain ol' frosting. I did his eye highlights with just a bit of white icing on a toothpick.


Filled in all the different areas with that slightly-thinned frosting...


Until his full face emerged! This, for those who don't watch Saturday morning cartoons aimed primarily at little girls and their families, is Discord, spirit of chaos, the main villain for the first couple of episodes of the second season.


Being spirit of chaos and disharmony, I wrapped his design down the sides of the cake, because Discord has no respect for your ideas of proper cake design. Here, you see his neck, mane, and horns poking down into the lower border.

Speaking of that border, I should have known putting a Lord of Chaos on a cake wouldn't go smoothly, I wanted that border to be done with a pretty star tip. So I fitted the tip to my trusty frosting bag and squeezed to remove air pockets -


And the bag exploded everywhere! It was my last frosting bag, too, so I had no choice but to jam the rest of the chocolate frosting in a regular freezer bag, snip the tip, and squeeze on a plain border.

Discord, spirit of Chaos, everybody! Jerk.


The good news is, bland border or no, Duck loved his cake. And when we sliced into these babies, mmmmm. 


Chocolately, buttery swirls of goodness!


I wish the marbling came out just a little prettier here. I think next time I'll go with smaller blobs of batter in that first marbling step to get a finer result.


Inside the giant cupcake, though, the marbling turned out absolutely gorgeous. I couldn't be prouder of the inside of this cake! (The outside, well, I learned a lot for next time!)


And there you have it, two marbled, baked, cooled, trimmed, frosted & decorated birthday cakes, one group of full & happy birthday party-goers, and one very tired baker.

Thanks for reading, and stay tuned, I've got some Valentine's sweets planned for very, very soon!

Until next time!