Showing posts with label chocolate cake. Show all posts

Monday, 30 April 2012

Bonus Monday Post: Flower Pot Cupcakes!

So, many of you have already seen the Flower Pot Cake I made last week. Well, after that, I had a bit of terracotta coloured fondant left. And some purple, and pink, and green.

What to do with all this leftover fondant?

Why, make mini versions of the same cake, of course!


Want to hear the easiest cake recipe ever? This is black midnight cake, straight out of that old Betty Crocker cookbook we inherited from my Great Grandma. The instructions, I swear to goodness, are pile all the ingredients into a bowl, and mix it. Seriously, that is about it.


Mix it for 30 seconds on low, then 3 minutes on high. Then you're ready to put it in your pans and bake up. Easiest. Thing. Ever. About as easy as using a mix! These cupcakes do come out a little crumbly, and they don't dome prettily like some recipes, but they taste so good and come together so easily that you won't even mind.

EDIT: I learned something cool! If you use pastry/cake flour instead of just all-purpose flour in these, they DO dome up prettily. Give it a try!


I portioned the batter into two cupcake pans, one with liners and the other greased, and baked each for 20 minutes.

Now, I didn't take pictures of what I'm about to describe, because I was simply too full of rage. So full of rage. The cupcakes that were in the greased pan didn't want to leave the pan. I swear, that can of generic brand pan spray is going right in the garbage.

Yes, I know greasing and flouring is always better than spraying. I know that, but also I am lazy. And greasing and flouring takes longer. So, yeah, had some trouble with those ones. In any case, we did get a few out of the pan intact enough for my decorating plan.


 I took the leftover terracotta fondant, rolled it out a little thicker than I wanted it, and used a large glass to get a rough circle. You see, I didn't have my 8,000 circular cookie/biscuit cutters with me because the decorating portion of this adventure took place at my Mom's place.

Hubby works nights, you see, so when I want to bake not-at-2-in-the-morning, I sometimes commandeer my mother's kitchen. Anyway, back to the fondant thing.


So cut the circle out of the fondant and then roll it out a little bigger and thinner until it's enough to cover the bottom and sides of your cupcake, like so:


The fondant's being held on by a thin, thin layer of chocolate buttercream. Just smooth it on with your clean, dry hands (this does take a bit of practise, on my first attempt the top edge tore!) then trim away the excess, and you'll have something that looks like this:


Now, spread a generous layer of chocolate frosting over the top, and cover that baby with Oreo crumbs.


Awwwwww yeeeeeeahhhhh. Just roll the frosted top about in your cookie crumb of choice until well coated. Hold the fondant sides very gently so as not to dent the smooth finish.

Once you have your cookie layer secured, take a small strip of fondant and use just a bit of water as glue to adhere it around the top of your cupcake, sticking fondant to fondant.

Remember the flowers we made for the cake? One fits perfectly in this little pot.


You can tell I was at my Mom's place, because that right there? That's actual daylight. I don't get that in my little basement apartment. It was such a gorgeous, bright day, I just had to take some shots out on the deck.

Oh, also, the cupcake looks really cute. I guess that's important, too.

...

*CRASH*

Oh no. Oh, jeez! Who dropped a flower pot?


Aw, and that was one of the flowers Mom made, too! Maaaaaaaaaaaan.

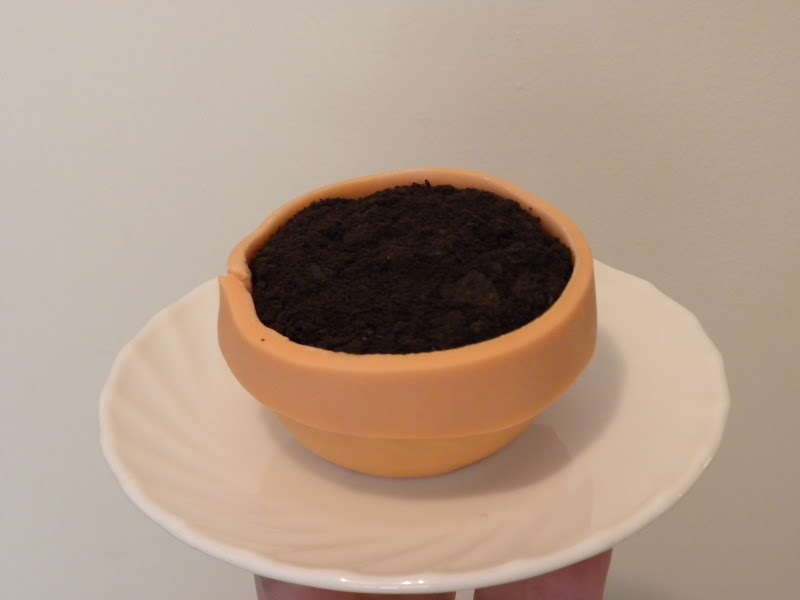
Of course, this is actually a purposeful disaster. I was unwilling to simply give up on some of the broken cupcakes that had stuck in the pan, so I trimmed up the bottom of one such cupcake to sit level, and turned it into a 'broken' flower pot cupcake. I covered the up-facing side with terracotta fondant, and then added cracks in it (see the chip out of the top?) and broken shards around.

I used the bit of cupcake I trimmed off and some frosting and Oreo crumbs for the spilled soil, and stuck the flower on with a bit more frosting, sliding halfway out of the broken pot, of course.

This guy was actually my favourite out of all the cupcakes my Mom and I decorated today.


Just look at that. Looks just like a busted flower pot. Not... not that I've broken a lot of them or anything. That was totally my little brother who broke the plant. Or, uh, the cat. Not me.

We also decorated a bunch of the cupcakes more traditionally, with swirls of frosting and royal icing flowers and such, but I really had to showcase the little flower pots. Who said leftovers can't be fun?


I found out today that decorating cupcakes is extra fun when you have someone to do it with. I wonder if you can tell which cupcakes I did and which my Mom helped with? (I'm not telling. Except, uh, the one covered in flower centers? Yeah, that wasn't me. Those are for the centers of flowers, Mom!!)

It was a super fun to have a little cupcake decorating party though... maybe someday soon I'll have a friend over to my place to help out with another project. Any volunteers?

In the meantime, if you want to try these yourself, here's the recipes:

Black Midnight Cake
From ancient Betty Crocker Cookbook, which I hopefully won't get sued for sharing?

2 1/4 cups flour
1 2/3 cups sugar
2/3 cups cocoa powder
1 1/4 tsp baking soda
1 tsp salt
1/4 tsp baking powder
1 1/4 cup water
3/4 cup shortening
2 large eggs
1 tsp vanilla

Pile all ingredients into large mixer bowl. Use hand mixer on low for 30 seconds, scraping down the sides with a spatula as you go, then mix 3 minutes on high speed, scraping down the sides occasionally.

Portion equally among 2 cupcake pans, makes a total of 24 cupcakes. Bake at 350 degrees for 18-20 minutes.

That's it! Told you it was easy.

Almost as easy as the frosting:

Easy Chocolate Buttercream Frosting


1/2 cup butter (use salted, it's way too sweet if you use unsalted. Seriously.)
1/3 cup cocoa powder
2 cups icing sugar
1 1/2 tsp vanilla
3 + tbsp milk

With an electric mixer, combine room-temperature butter and cocoa powder until smooth. Start slow so you don't coat your kitchen in cocoa. Slowly add the 2 cups of icing sugar. Add the vanilla and milk.

From here you have to add a bit more milk, a little at a time, until you get your desired consistency. This will vary a bit depending on humidity and such, so just test it after each addition of milk until it's spreadable but not runny. Then you're good to go!

***

Until next time!

Thursday, 26 April 2012

Flower Pot Chocolate Cake

Recently, my Mom turned the big five-oh. I'm not sure how happy she is that I'm telling the entire internet that, but the fact stands!

In any case, I wanted to make her a super incredible cake, because hey, you only get one 50th birthday! So I asked what kind of cake she wanted.

"Oh, you know. Something chocolate, chocolate frosting... and oh, make it purple and pink!"

I was awful happy to hear this, you see, because I'd been just itching to try my hand at a cake like this!


Now, if you have a look at the cake sold through Williams Sonoma you will notice some key differences between the inspiration and my final product. Many of these differences are due to the fact that their cake serves 4, mine serves 12 to 16.

Want to make your own? Check it out:


First, bake up 3 6-inch layers of your favourite chocolate cake. (You want to avoid anything very crumbly or soft for this, firmer cake is better when you're stacking multiple layers.)


Cool 'em, frost 'em & stack 'em, and get a thin chocolate buttercream crumb coat all around your little cake tower.

If you want your cake even taller, try splitting and filling each layer cake as you go. The bonus if you go that route, of course, is that you get a lot more frosting on this baby. I was happy with the height though, so I left it as is.


Next, you'll need to apply your fondant. I started with an ivory-coloured, store-bought fondant and used a combination of red, yellow and brown gel colours to get a terracotta shade.


For the love of goodness, be sure to add your colours bit by bit until you reach your desired shade. Yes, your arms will ache from kneading it over and over. Yes, the fondant will grow sticky and you'll need to dust it frequently with icing sugar to keep it workable. Yes, the frosting on your cake will set while you're doing this, but that's okay, just add another thin coat before you put the fondant on.

Trust me though, it is well worth the trouble to take your time on the colour, rather than to use far too much of the dye and ruin 2 pounds of fondant. This stuff ain't cheap!

And yes, I know 'ain't' ain't a word. I like to get colloquial up in here sometimes. So sue me. Side note: isn't it kind of funny how the word 'colloquial' is so formal-sounding? Oh, yes, I know you came to a baking blog for grammatical irony humor today, don't deny it.

Oh, wait, we were making a cake, weren't we?


I used a couple of actual terracotta pots to compare until I got a close enough colour. This was as dark as I could get it before my poor arms began to give up on kneading, and I still had much to do, so I had to call it close enough.


I rolled the fondant out to about an eighth of an inch thick, and wrapped a big rectangle around the cake. I used a paring knife to cut away all the excess. This technique did leave a seam on one side of the cake, but it also used less fondant than simply draping the whole cake, and I didn't want the top covered anyway.

I also cut a long, skinny rectangular strip of fondant and, after dampening the top inch or so of the side of the cake with a damp paper towel, stuck the extra strip on to make the lip of the pot. Somehow, I completely neglected to get any pictures of that process.


Next up, creating the flowers. These. Are. SO. Easy! Use a cutter (or candy thermometer protective cover, as I did, since I didn't have a cookie/fondant cutter small enough) a bit smaller than the size you want your petals, and cut circles out of coloured fondant about an 1/8 of an inch thick.

Then, work the circles with your fingers, flattening and stretching them a but until they resemble rounded flower petals.


I'm sorry this pic is so blurry - it was right around this time that I ran out of memory on the camera and had to change the SD card... and forgot to get a better shot of this. I swear, I ought to just hire a photographer to take care of this part!


So, once you have your 5 round petal shapes, arrange them into a flower shape, carefully having one petal overlap the next slightly. When you've arranged the petals to your liking, use a tiny, tiiiiny bit of water to 'glue' the petals together where they overlap. Repeat until you have enough flowers to cover the top of your cake.

If you want your flowers to curve upwards, place them into a lightly icing-sugar-dusted flower form. Or, if, like me, you can't clutter up your kitchen with a billion specialty flower forms, simply put them in tiny little bowls, or make little concave nests out of aluminum foil. Whatever works!

In any case, let your flowers sit in your mold of choice for at least 1-2 hours until the fondant firms up enough to hold its shape.

In the meantime, make your leaves:


Pretty straight forward here. Green fondant, rolled out 1/8 inch thick, cut into leaf shapes with a paring knife. Ideally, you can add the veining with an actual veining tool but again, I don't quite have every cake decorating gadget, so I simply used the wrong side of my paring knife blade to make the leaf details. It worked out quite well! If you want to give your leaves dimension, let them set on curved surfaces, or draped over a spoon handle. I did a bit of each for variety.


Now here is why I didn't want to cover the whole top of the cake with fondant - it would get between the cake and more frosting! Slather on a generous amount of chocolate frosting, being careful not to smear it over the outer fondant lip.


Then - and this is my favourite part! - cover every inch of the frosting with Oreo cookie crumbs. You won't get that at Williams Sonoma!

Oops, did I just type that? Guess I did. Well, no going back now.

Once your cake top is deliciously coated with Oreo crumbs (remove the Oreo filling before crushing them up, by the way. I know, it seems a waste of good icing guck, but this is for the greater good!) add dollops of your chocolate butter cream and press your fondant flowers on them one by one.

I made the centers of these flowers ahead of time - they're simply daubs of royal icing sprinkled with a bit of sugar and left to harden overnight. Once they're set, they'll last practically forever until you're ready to use them. Whenever I have leftover royal icing, I make flower centers of all kinds. You never know when you'll have a serious, five-alarm, cake decorating emergency, so be prepared.


Once you've arranged all your blooms and leaves, you'll have something that looks like this. Now, it's tough to see in the pictures, but as an extra detail, I took a pastry brush and some powdered sugar, and made sugar brushstrokes horizontally around the cake. I was trying to replicate the look of the terracotta pots, and though it is hard to see in the pics here, I assure you it was a lovely, subtle detail! 


Sliced and served, this cake had everyone in the room - most importantly of all, the birthday girl - in smiles. The cake was so tall we split each slice into a top and bottom. There may have been minor riots over who got the Oreo-crumbiest pieces. Perhaps in future I will create a middle Oreo crumb layer to prevent such senseless cake-induced violence. (Okay, there was no violence, I'm just being dramatic again. People did argue for the top pieces though.)

So as you can see, it's not all that hard to make your very own fancy flower pot cake! It is, however, quite time-consuming. I'd say I spent a minimum of four hours on this baby, all things accounted for, so don't start baking the night before you need it! I spread the work out over 2 days, plus the morning of the party, when I attached the flowers. Of course, if you use a cake mix or buy frosting from the store, you would save a lot of time.

I hope you're inspired to try something new yourself! Putting this cute little cake together gave me such a confidence boost, I felt like I could do anything. Maybe even bake a pie! With a home-made crust! From scratch!

But, no, that's madness. Pie crust and I... we have a dark history. Dark, and tough. And a bit chewy. But that's really for another post! I've rambled on long enough for now.

Until next time!

Thursday, 2 February 2012

Crafted in Fine Marble

... Cake. Fine marble cake.

In that I made some marble cakes and they turned out just fine. I made a giant cupcake for a dear friend (I haven't yet figured out which of her many nicknames I should refer to her as, so she remains 'dear friend' for now, heh) and a regular layer cake for my brother with a special frosting design, and we had a little double-birthday get-together to share them with everyone.

Pretty swirls of chocolate and vanilla are easier to achieve than you might think!
As we cut and served the cakes, people kept asking:

"How did you marble them like that?"
"How did you make these pretty swirls?"
"How did you keep it all from just turning beige?"

And I had to laugh. And maybe it was rude of me to laugh but you have to understand - it is the easiest thing ever. Anyone can do it! I will show you.

Start with your favourite white - or yellow like I've used here, since I prefer yellow cakes in general - cake batter, and a separately prepared bowl of chocolate cake batter.

Bonnie Butter Cake Batter

Black Midnight Cake Batter
I'm obsessed with making things from scratch so these are from the ol' family recipe collection, but you could use cake mix or whatever recipe you like.

Prepare your pans. I often go the fast & easy way and just use non-stick pan spray, but I find more and more that I end up with hard, crunchy cake edges that sort of shrink away from the sides of the pan. If anyone's seen the Reese Cake post, you may also notice things often still stick to the pan. These were special occasion cakes I was making, so I took the extra precaution of greasing & flouring them.

It takes a little longer, and it makes a bit of a mess, but I was hoping it would be worth it when it came time to de-pan the cakes. So, I took a paper towel smeared with Crisco and rubbed it all over the pans, then dropped a couple of tablespoons of flour into the first layer pan.


I held it over the next layer pan as I rotated and tapped and shook the pan about to get the flour all over. You'll and up with a thin coating in some places and chunks of flour in others, but that's okay! Once there's no shortening-coated pan left unfloured, turn it upside down over the other pan and give it a couple smacks.


Voila. A thin coating of flour over your pan. Repeat for the other pan, but when you give that one its final smack, hold it over the garbage, or a large bowl if you wish to reserve the flour because you're making more than one cake.

I was, of course, making two cakes so I tried to tap the excess flour off into the giant cupcake pan, but, well, that's where the 'bit of a mess' part comes in. I had to wipe up a lot of spattered flour when I was all done, let me tell you.


Getting the flour all over the inside of the greased cupcake pan, and NOT getting it all over my kitchen proved  a task simply too great for me. Next time maybe I'll do it over my largest sheet pan to avoid another flour-pocalypse.


Once your pans are all floured, it is marblin' time! (That sounds like a really, really lame super hero battle cry. I'm going to use that now.)

So, take about a quarter of your yellow cake batter and plop it into the pan at random-ish intervals. You don't want a smooth layer of cake batter here - you want random blobby clumps. Then just plop some chocolate cake batter down between and over them.


Like so. If it looks like a blobby, uneven mess, you're doing it right!


Now take a small spoon and gently swirl it through the batter, round & round and back and forth until the batters look, well, marbled. You want to avoid hitting or scraping the sides & bottom of the pan or you'll mess up the flour layer, and try no to over-swirl it or it really will turn beige!

Once it looks swirly, use your spoon or a spatula to smooth the top out.


At this point, I worried ever-so-slightly that I had ruined the marbling, but only the very top was covered in a chocolate layer, the lower bits were still marbled nicely. Repeat this process for the other layer. I personally switched it up and put the chocolate batter blobs in first this time.


After swirling & smoothing, the marbling still showed through the top. I'll probably do it like this from now on.


I repeated the whole process for the giant cupcake. The only difference was that, because this pan was so deep, I had to put a few blobs of each batter, marble it, then put more on top and carefully marble that. If I'd put all the batter in at once, I don't think I would have been able to marble them without completely destroying the flour coating.


Then I followed the recipes' baking directions for layer cakes, and they came out gorgeous!


So swirly! At first I thought my giant cupcake had come out perfect too...


Swirly! Gorgeous! Jiggly! ... Wait, jiggly??

Aw, nuts! The depth of this pan not only complicated marbling, it complicated baking! The 'top' portion of the cupcake cake was actually perfectly baked, but the 'bottom' bit was still mostly liquid in the middle! I had to extremely, extremely carefully tip the pan to extract the cupcake top while trying to keep the bottom in place.

I managed to get the top half out to cool, then turned the temp down 25 degrees on the oven and baked the bottom for another 20 minutes. Oy.

Moving on.


Why am I showing you this kind of uninteresting cake bottom shot? I mean, it's just a smooth, slightly floury cake bottom.

That didn't stick to the pan. That popped out perfectly when I flipped it over. That's why! The shortening & flouring mess is now justified! All the cakes popped easily out of their pans with a gentle shake & tap. Amazing.


When the bottom was finally baked I set it out to cool... and noticed I had definitely dented it when I took out the other half of the cake earlier. Well, nothing a little trimming can't cure.

I'm actually going to call this post done for now since I really just wanted to talk about the marbling and oh my goodness this got way longer than I meant it to! So thank you for slogging through this long post, and keep an eye out for part two where I actually put some frosting on these things and serve 'em up!

Until then!