So, many of you have already seen the Flower Pot Cake I made last week. Well, after that, I had a bit of terracotta coloured fondant left. And some purple, and pink, and green.
What to do with all this leftover fondant?
Why, make mini versions of the same cake, of course!

Want to hear the easiest cake recipe ever? This is black midnight cake, straight out of that old Betty Crocker cookbook we inherited from my Great Grandma. The instructions, I swear to goodness, are pile all the ingredients into a bowl, and mix it. Seriously, that is about it.

Mix it for 30 seconds on low, then 3 minutes on high. Then you're ready to put it in your pans and bake up. Easiest. Thing. Ever. About as easy as using a mix! These cupcakes do come out a little crumbly, and they don't dome prettily like some recipes, but they taste so good and come together so easily that you won't even mind.
EDIT: I learned something cool! If you use pastry/cake flour instead of just all-purpose flour in these, they DO dome up prettily. Give it a try!

I portioned the batter into two cupcake pans, one with liners and the other greased, and baked each for 20 minutes.
Now, I didn't take pictures of what I'm about to describe, because I was simply too full of rage. So full of rage. The cupcakes that were in the greased pan didn't want to leave the pan. I swear, that can of generic brand pan spray is going right in the garbage.
Yes, I know greasing and flouring is always better than spraying. I know that, but also I am lazy. And greasing and flouring takes longer. So, yeah, had some trouble with those ones. In any case, we did get a few out of the pan intact enough for my decorating plan.

I took the leftover terracotta fondant, rolled it out a little thicker than I wanted it, and used a large glass to get a rough circle. You see, I didn't have my 8,000 circular cookie/biscuit cutters with me because the decorating portion of this adventure took place at my Mom's place.
Hubby works nights, you see, so when I want to bake not-at-2-in-the-morning, I sometimes commandeer my mother's kitchen. Anyway, back to the fondant thing.

So cut the circle out of the fondant and then roll it out a little bigger and thinner until it's enough to cover the bottom and sides of your cupcake, like so:

The fondant's being held on by a thin, thin layer of chocolate buttercream. Just smooth it on with your clean, dry hands (this does take a bit of practise, on my first attempt the top edge tore!) then trim away the excess, and you'll have something that looks like this:

Now, spread a generous layer of chocolate frosting over the top, and cover that baby with Oreo crumbs.

Awwwwww yeeeeeeahhhhh. Just roll the frosted top about in your cookie crumb of choice until well coated. Hold the fondant sides very gently so as not to dent the smooth finish.
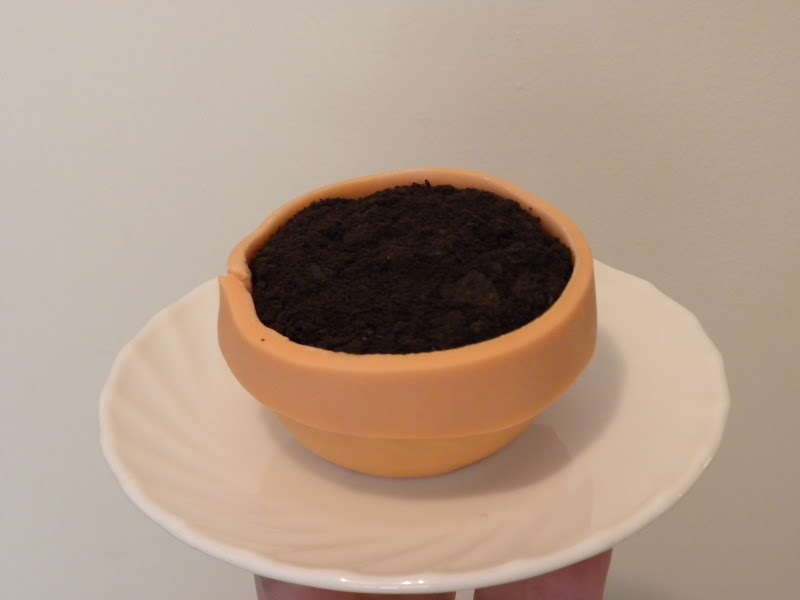
Once you have your cookie layer secured, take a small strip of fondant and use just a bit of water as glue to adhere it around the top of your cupcake, sticking fondant to fondant.
Remember the flowers we made for the cake? One fits perfectly in this little pot.

You can tell I was at my Mom's place, because that right there? That's actual daylight. I don't get that in my little basement apartment. It was such a gorgeous, bright day, I just had to take some shots out on the deck.
Oh, also, the cupcake looks really cute. I guess that's important, too.
...
*CRASH*
Oh no. Oh, jeez! Who dropped a flower pot?

Aw, and that was one of the flowers Mom made, too! Maaaaaaaaaaaan.
Of course, this is actually a purposeful disaster. I was unwilling to simply give up on some of the broken cupcakes that had stuck in the pan, so I trimmed up the bottom of one such cupcake to sit level, and turned it into a 'broken' flower pot cupcake. I covered the up-facing side with terracotta fondant, and then added cracks in it (see the chip out of the top?) and broken shards around.
I used the bit of cupcake I trimmed off and some frosting and Oreo crumbs for the spilled soil, and stuck the flower on with a bit more frosting, sliding halfway out of the broken pot, of course.
This guy was actually my favourite out of all the cupcakes my Mom and I decorated today.

Just look at that. Looks just like a busted flower pot. Not... not that I've broken a lot of them or anything. That was totally my little brother who broke the plant. Or, uh, the cat. Not me.
We also decorated a bunch of the cupcakes more traditionally, with swirls of frosting and royal icing flowers and such, but I really had to showcase the little flower pots. Who said leftovers can't be fun?

It was a super fun to have a little cupcake decorating party though... maybe someday soon I'll have a friend over to my place to help out with another project. Any volunteers?
In the meantime, if you want to try these yourself, here's the recipes:
Black Midnight Cake
From ancient Betty Crocker Cookbook, which I hopefully won't get sued for sharing?
2 1/4 cups flour
1 2/3 cups sugar
2/3 cups cocoa powder
1 1/4 tsp baking soda
1 tsp salt
1/4 tsp baking powder
1 1/4 cup water
3/4 cup shortening
2 large eggs
1 tsp vanilla
Pile all ingredients into large mixer bowl. Use hand mixer on low for 30 seconds, scraping down the sides with a spatula as you go, then mix 3 minutes on high speed, scraping down the sides occasionally.
Portion equally among 2 cupcake pans, makes a total of 24 cupcakes. Bake at 350 degrees for 18-20 minutes.
That's it! Told you it was easy.
Almost as easy as the frosting:
Easy Chocolate Buttercream Frosting
1/2 cup butter (use salted, it's way too sweet if you use unsalted. Seriously.)
1/3 cup cocoa powder
2 cups icing sugar
1 1/2 tsp vanilla
3 + tbsp milk
With an electric mixer, combine room-temperature butter and cocoa powder until smooth. Start slow so you don't coat your kitchen in cocoa. Slowly add the 2 cups of icing sugar. Add the vanilla and milk.
From here you have to add a bit more milk, a little at a time, until you get your desired consistency. This will vary a bit depending on humidity and such, so just test it after each addition of milk until it's spreadable but not runny. Then you're good to go!
***
Until next time!