Showing posts with label cupcakes. Show all posts

Thursday, 12 July 2012

Canada Day Cupcakes

Yes, Canada Day was well over a week ago, I know.

But it is never too late to love my country! Especially in cupcake form.


Cheesy patriotism aside, there are a couple of reasons I'm sharing this so late. One is that I actually made these after Canada Day. The boys were away at Bronycon that entire weekend, as I may have mentioned briefly. So I whipped these up the day after Canada Day to be ready for their homecoming.

I also threw some welcome home messages on the leftover sugar cookies for the boys to munch.

Just ignore the one from the cats. I was very tired and mildly delirious when I decorated those.

Ah, so sentimental, especially that cookie right in the middle there. It's like a Hallmark card.

Now, I can't take credit for any of these photos, since hubby took them for me. I may or may not have burned my thumb extremely painfully while lighting fireworks for our (also a day late) Canada Day display and couldn't really handle the camera just then.


I also don't have how-to pics, because hubby took the camera with him on the Bronycon trip! (Kind of another reason this is so late... I was originally not going to make this post at all since it's so lacking in photos!)

So I'll try to explain the icing technique as best I can... I made a basic vanilla buttercream and tinted about half of it red. Then I piped a stripe of un-tinted white frosting down the middle of each cupcake and used a small off-set spatula to smooth it a bit. Once it was as smooth as I could get it, I piped the red frosting on either side to resemble the red fields of the flag, and again smoothed things out with the spatula.

To try to get an even smoother finish, I pressed and rolled the cupcake tops in granulated sugar.

Finally, I freehand-piped red maple leaves onto the white fields to complete the Canadian flag look, and pressed it into the sugar again, gently, so the whole top of the cupcake sparkled subtly.


Inside, as you can see, was white cake with red confetti. Much like I've done before, I simply folded some sprinkles into my favourite white cake recipe. Only this time, I actually kept control of myself and measured the sprinkles properly. The cake part turned out just perfect!

I should mention that the frosting technique I used was inspired by these awesome snow cone cupcake by Bakerella. Seriously, how adorable are those?? Anyway, I'd really like to do something like this again to better refine the technique, but as is, these were a nice welcome home surprise for homecoming hubby and bro.


What did you do for Canada Day? Or the Fourth of July? Or your country's own special holiday? I've lived my whole life in Canada and I hardly travel, so I'd love to hear how other countries celebrate their independence or founding anniversary holidays or what have you!

Next week, I'll share my attempt at whoopie pies, which will be a much longer and more in-depth post!

Until then!

Thursday, 24 May 2012

Fireworks Cupcakes: Sweet, Spicy, and Unexpected!

Besides working full-time as a charity fundraiser, I help out seasonally at a fireworks shop called Kaboom! Let me tell you, it is super-fun answering the phone and saying, "KABOOM! How can I help you?"

But maybe that's just me.

In any case, I had been batting a new flavor idea around in my head for a while and being called back to the shop for Victoria Day weekend gave me the nudge I needed to put it into action!


So I whipped up my favorite yellow cake - Bonnie Butter Cake, recipe below - and as a control batch, made 12 plain cupcakes in plain white wrappers.

Then it was time to experiment!


That, my friends, is crushed red chili flakes, which I crushed myself in my mortar and pestle. I knew I bought that thing for a reason.


Next, to be sure there'd be no confusion as to which cakes were regular and which were extra spicy, I chose bright red wrappers for the spicy half.


Then I filled the cups and baked like usual. Well, except that when I usually bake cupcakes, I don't get a faint whiff of chili from the oven, but I suppose that's to be expected.


Next I invented a very simple, Thai-flavours-inspired frosting consisting chiefly of peanut butter, icing sugar and coconut milk. My brother, Duck, happened to be assisting, and asked how I made the frosting.

"Oh, it's really easy," I said, "You just throw it all together in a bowl and -"


"... Okay, not that easy, jeez."

Actually, measure out a 1/2 cup of peanut butter and, using a hand mixer, slowly add 3 cups of icing sugar while mixing until the peanut butter is pretty evenly distributed.


Then add 1 teaspoon of vanilla and a tablespoon of coconut milk at a time, mixing on medium in between additions until a smooth frosting forms, like so:


Because of the amount of peanut butter, the frosting will have a somewhat goopy consistency. If it gets too soft to pipe, simply add a bit more icing sugar to firm it up.


The plain cupcakes were topped with pretty swirls of peanut butter coconut frosting. Of those who tried the plain cupcakes, I heard both that the coconut flavor was too strong, and that it wasn't strong enough, so I suppose you can adjust the level of coconut milk depending on your liking. Simply replace the coconut milk with regular milk when you feel you have enough coconut flavor.


The spicy cupcakes got a swirl of icing, too, but I wasn't stopping there, oh no. I mixed up a simple icing glaze.


Then I made it less simple and more sensational! Add as much sriracha sauce as you think you can handle.

Then add a little more.

Then a little more than that.

Seriously. I thought I had made mine too hot until I put it on the cupcakes and tried it. The frosting's richness really brings the heat level down, so feel free to go a little nuts with the hot sauce!


You could stop here, but I felt the glaze looked kind of pale-orange-beige and I really wanted it to visually scream: WARNING! SPICINESS AHEAD! So I threw in a bit of red food colour, with a smidge of brown to try to approximate the colour of the sriracha sauce.


Now that says hot! I dipped a spoon into the glaze and simply drizzled it over the top of the cupcake, like so:


Feel free to adjust the amount of the glaze to your own liking. Heat levels are a very subjective thing... 'not hot enough' to me might be equivalent to 'oh god my eyeballs are melting!' to you, so be sure to keep that in mind.


So I packed up the spicy Fireworks and took them to the fireworks store. I also brought the plainer ones in case of non-spice fans. And you know what?

Most of the staff was afraid to try them!

Seriously, guys? Seriously? You're okay to work in a building full of explosives, but a little hot sauce on your cupcake freaks you out? Come on.

The manager was brave enough to try one. Then he was brave enough to try a second, so I'll take that as a good review. Hubby devoured a couple himself and I certainly had my share!

Hubby took what was left to his workplace the next night, and they pretty much disappeared, all reviews were positive - unless hubby just didn't want to hurt my feelings - but seeing as the trays returned very nearly empty, I'm inclined to believe the overnight staff at the fast food restaurant truly did enjoy these!

Of course, these are the same guys who sneak bacon into their ice cream treats, so... take that as you will.
On another note, these cupcakes were featured on My Food Looks Funny (and before you get upset about the caption, know that I wrote it, poking fun at my own creation!) so definitely go check out the other funky treats and oddities over there.

Want to make your own? Here's all the required recipes:

Bonnie Butter Cake
Another one adapted out of the ol' Betty Crocker book

2/3 Cups Butter, salted
1 3/4 Cups Sugar
2 Large Eggs
1 1/2 tsp Vanilla
2 3/4 Cups Cake or Pastry Flour
2 1/2 tsp Baking Powder
1 tsp Salt
1 1/4 Cups Milk
1 tsp Red Chili Flakes, crushed (if making fireworks cupcakes, optional. Add more if you're a real heat fan!)

Mix butter, sugar eggs and vanilla until fluffy.  Beat 5 minutes on high speed with hand- (or stand-) mixer, scraping sides down occasionally. In separate bowl, combine flour, baking powder, chili flakes (if using) and salt. Reduce mixer speed to low and add dry ingredients bit by bit, alternating with milk, until well combined.

Pour into lined cupcake pans and bake at 350 degrees for 17-19 minutes. Makes 24 cupcakes.

***

Peanut Butter & Coconut Frosting
From my brain, where I get most of my ideas.


1/2 Cup Peanut Butter
3 Cups Icing Sugar
1 teaspoon Vanilla
5-6 tablespoons Coconut Milk (not coconut water or beverage!)

Cream peanut butter with hand mixer on low, slowly add icing sugar until peanut butter is distributed throughout. Add vanilla, and first tablespoon of coconut milk. Be sure your bowl and mixer are very secure, due to the thickness of the frosting at this point, the bowl can try to get away from you!

The next thing you know, the mixer's out of control and spraying frosting everywhere! Not that it would ever happen to me.

Get that photo out of here!

In any case, add a tablespoon of coconut milk at a time until the frosting reaches a spreadable (but yes, it will be kind of goopy) consistency.

***

Sriracha Glaze
Only the brave need apply.

1 Cup Icing Sugar
1 tblsp Coconut Milk (or regular milk)
1 tblsp  Water
Sriracha sauce to taste. Then a bit more than that.


Food Colouring, optional

With a fork or small whisk, combine icing sugar, coconut milk, and water. Add sriracha sauce a bit at a time until desired heat level is reached. Add food colouring, if using, until desired shade is achieved.

***

So, feeling adventurous, my friends? Give these suckers a try. If you dare!

Until next time!

Monday, 30 April 2012

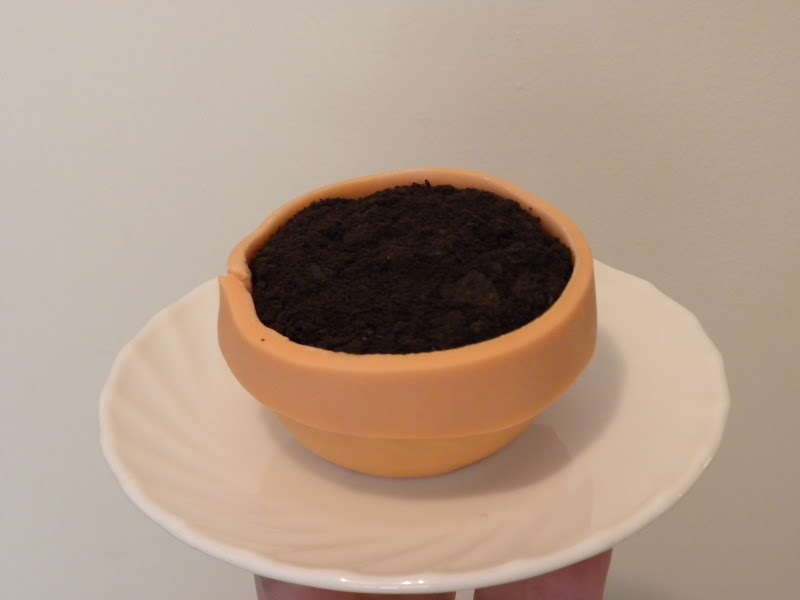
Bonus Monday Post: Flower Pot Cupcakes!

So, many of you have already seen the Flower Pot Cake I made last week. Well, after that, I had a bit of terracotta coloured fondant left. And some purple, and pink, and green.

What to do with all this leftover fondant?

Why, make mini versions of the same cake, of course!


Want to hear the easiest cake recipe ever? This is black midnight cake, straight out of that old Betty Crocker cookbook we inherited from my Great Grandma. The instructions, I swear to goodness, are pile all the ingredients into a bowl, and mix it. Seriously, that is about it.


Mix it for 30 seconds on low, then 3 minutes on high. Then you're ready to put it in your pans and bake up. Easiest. Thing. Ever. About as easy as using a mix! These cupcakes do come out a little crumbly, and they don't dome prettily like some recipes, but they taste so good and come together so easily that you won't even mind.

EDIT: I learned something cool! If you use pastry/cake flour instead of just all-purpose flour in these, they DO dome up prettily. Give it a try!


I portioned the batter into two cupcake pans, one with liners and the other greased, and baked each for 20 minutes.

Now, I didn't take pictures of what I'm about to describe, because I was simply too full of rage. So full of rage. The cupcakes that were in the greased pan didn't want to leave the pan. I swear, that can of generic brand pan spray is going right in the garbage.

Yes, I know greasing and flouring is always better than spraying. I know that, but also I am lazy. And greasing and flouring takes longer. So, yeah, had some trouble with those ones. In any case, we did get a few out of the pan intact enough for my decorating plan.


 I took the leftover terracotta fondant, rolled it out a little thicker than I wanted it, and used a large glass to get a rough circle. You see, I didn't have my 8,000 circular cookie/biscuit cutters with me because the decorating portion of this adventure took place at my Mom's place.

Hubby works nights, you see, so when I want to bake not-at-2-in-the-morning, I sometimes commandeer my mother's kitchen. Anyway, back to the fondant thing.


So cut the circle out of the fondant and then roll it out a little bigger and thinner until it's enough to cover the bottom and sides of your cupcake, like so:


The fondant's being held on by a thin, thin layer of chocolate buttercream. Just smooth it on with your clean, dry hands (this does take a bit of practise, on my first attempt the top edge tore!) then trim away the excess, and you'll have something that looks like this:


Now, spread a generous layer of chocolate frosting over the top, and cover that baby with Oreo crumbs.


Awwwwww yeeeeeeahhhhh. Just roll the frosted top about in your cookie crumb of choice until well coated. Hold the fondant sides very gently so as not to dent the smooth finish.


Once you have your cookie layer secured, take a small strip of fondant and use just a bit of water as glue to adhere it around the top of your cupcake, sticking fondant to fondant.

Remember the flowers we made for the cake? One fits perfectly in this little pot.


You can tell I was at my Mom's place, because that right there? That's actual daylight. I don't get that in my little basement apartment. It was such a gorgeous, bright day, I just had to take some shots out on the deck.

Oh, also, the cupcake looks really cute. I guess that's important, too.

...

*CRASH*

Oh no. Oh, jeez! Who dropped a flower pot?


Aw, and that was one of the flowers Mom made, too! Maaaaaaaaaaaan.

Of course, this is actually a purposeful disaster. I was unwilling to simply give up on some of the broken cupcakes that had stuck in the pan, so I trimmed up the bottom of one such cupcake to sit level, and turned it into a 'broken' flower pot cupcake. I covered the up-facing side with terracotta fondant, and then added cracks in it (see the chip out of the top?) and broken shards around.

I used the bit of cupcake I trimmed off and some frosting and Oreo crumbs for the spilled soil, and stuck the flower on with a bit more frosting, sliding halfway out of the broken pot, of course.

This guy was actually my favourite out of all the cupcakes my Mom and I decorated today.


Just look at that. Looks just like a busted flower pot. Not... not that I've broken a lot of them or anything. That was totally my little brother who broke the plant. Or, uh, the cat. Not me.

We also decorated a bunch of the cupcakes more traditionally, with swirls of frosting and royal icing flowers and such, but I really had to showcase the little flower pots. Who said leftovers can't be fun?


I found out today that decorating cupcakes is extra fun when you have someone to do it with. I wonder if you can tell which cupcakes I did and which my Mom helped with? (I'm not telling. Except, uh, the one covered in flower centers? Yeah, that wasn't me. Those are for the centers of flowers, Mom!!)

It was a super fun to have a little cupcake decorating party though... maybe someday soon I'll have a friend over to my place to help out with another project. Any volunteers?

In the meantime, if you want to try these yourself, here's the recipes:

Black Midnight Cake
From ancient Betty Crocker Cookbook, which I hopefully won't get sued for sharing?

2 1/4 cups flour
1 2/3 cups sugar
2/3 cups cocoa powder
1 1/4 tsp baking soda
1 tsp salt
1/4 tsp baking powder
1 1/4 cup water
3/4 cup shortening
2 large eggs
1 tsp vanilla

Pile all ingredients into large mixer bowl. Use hand mixer on low for 30 seconds, scraping down the sides with a spatula as you go, then mix 3 minutes on high speed, scraping down the sides occasionally.

Portion equally among 2 cupcake pans, makes a total of 24 cupcakes. Bake at 350 degrees for 18-20 minutes.

That's it! Told you it was easy.

Almost as easy as the frosting:

Easy Chocolate Buttercream Frosting


1/2 cup butter (use salted, it's way too sweet if you use unsalted. Seriously.)
1/3 cup cocoa powder
2 cups icing sugar
1 1/2 tsp vanilla
3 + tbsp milk

With an electric mixer, combine room-temperature butter and cocoa powder until smooth. Start slow so you don't coat your kitchen in cocoa. Slowly add the 2 cups of icing sugar. Add the vanilla and milk.

From here you have to add a bit more milk, a little at a time, until you get your desired consistency. This will vary a bit depending on humidity and such, so just test it after each addition of milk until it's spreadable but not runny. Then you're good to go!

***

Until next time!

Friday, 16 March 2012

"Irish Car Bomb" Cupcakes

I must say, I was very nervous to make these cupcakes. Terribly, terribly, nervous. I had an awful feeling that - well, that they just wouldn't taste good! Chocolate and Guiness? In a cupcake? I was afraid I wouldn't like them.

I don't think I've ever been so wrong.

Just look at how this amazing recipe by the incomparable Sweetapolita starts:


That, my friends, is 1 1/2 cups of butter melting luxuriously in a steaming pot of hot Guinness. Oh my.


I think I should share the fact that I am not a beer fan, really. The only beer I come close to drinking is Guinness stout, which I guess isn't even really a beer but you know what I mean. Even then, I could never drink more than a few mouthfuls.

All that said, I LOVE cooking with it! It is fantastic in stews, and as I learned today, cupcakes! Who knew?

Well... Sweetapolita knew, I guess. And Amanda at I am Baker where I first learned that such a thing could exist. And the other 1,000 people on the internet who did recipes like this. Oh well, it's new to me.

In any case, back to the butter melting in the Guinness!


Cocoa powder has now been invited to the party. Sift it right in there and whisk until silky smooth.


... Like this! Oh, it looks so silky and delicious! But, it's not yet. Do not try to taste it at this point, there is not yet any sugar in here, and cocoa powder without sugar is bitter as all get-out. I accidentally dripped some onto my wrist when I was pouring it into heat-proof containers to cool (I didn't have a single container big enough for all of it) and without thinking, I licked the hot liquid away.

The very definition of regret, my friends. Eyuck!


While the stout & cocoa mixture is cooling, whisk up all the dry ingredients - flour, sugar, baking powder and salt.


Now, Sweetapolita's blog gives instructions for how to make this cake batter using a KitchenAid mixer. I can only dream, misty-eyed and longingly, of the day when one might grace my kitchen.

In the meantime, my Cuisinart hand mixer did a fine job of blitzing up the sour cream and eggs.


Once the eggs and sour cream are blended, add the cooled cocoa mixture in and mix on medium speed. It is, by the way, tantamount that you cool this stuff thoroughly before mixing it with the eggs, or you may end up with chocolate Guinness scrambled sour cream eggs. Uh, probably not tasty.


Once everything looks smooth, silky & homogeneous, you can start mixing in your dry ingredients bit by bit.


Like so. Be sure to scrape the sides down between additions to ensure a smooth batter.


Now I know I was just saying a couple of steps ago not to taste this stuff, but now that the sugar and all is in there, I had to try. Whenever I make a new type of cake I always taste a bit of the batter before I bake it, and this 100% passed the batter test!

(Legal/responsible blurb time: raw eggs are bad for you. Please don't eat raw batter with unpasteurized eggs in it. Besides, if you don't, it means more batter left for me!)


I wanted to keep the decorating simple on the cupcakes, so I just grabbed this cute cupcake cup & pick set from my local Bulk Barn. Cutest shamrocks ever!


I used my trusty 1-inch scoop and put 2 scoopfuls of batter into each standard cupcake liner. Then bake 'em at 350 degrees for about 18 minutes. I used the toothpick test to make sure they were done when they came out.


These turned out perfectly. Well, very nearly perfectly. I may have over-mixed them ever so slightly due to my lack of incredible KitchenAid stand mixer and guessing on the settings to use on my hand mixer, but oh well. Someday.


For the frosting, I must give credit to my friend Lindsay. I was originally going to do a whiskey frosting, until she put it into my head that a pure Bailey's Irish Cream frosting would go well. So, these consist of the following:

1/3 C of butter, salted (I know, they always say to use unsalted, but trust me on this one.)
3 C icing sugar
1 tbsp Bailey's Irish Cream liquer
2-3 tbsp milk

Just cream the butter with your hand mixer, then gradually add the icing sugar. Once you have little bitty chunks of butter all through the sugar, add your Bailey's, and the milk bit by bit, using your hand mixer set to medium to mix it the whole time. Add only enough milk for it to be of good spreading/piping consistency.

Top with adorable decoration of your choice.


So, is it any good? Well, a new friend at work took a bite, turned to me with wide eyes and breathed, "Oh my gosh, it's like I'm eating a cloud. What is happening?"

She then proceeded to savor every last bite. Everyone who was brave enough to try one enjoyed it thoroughly. I very, very highly recommend these. The sweet and light Bailey's frosting perfectly compliments the rich, deep flavor of the cupcake... you know what? I can't describe it better than that quote did. Just try it yourselves, folks. You will not be disappointed.

Happy St Patrick's Day, folks!

Until next time!

PS: I know that an Irish Car Bomb drink usually involves an Irish whiskey as well, but frankly, I didn't have any whiskey on hand, and I really don't much like the stuff, so I didn't want to buy any! If you are a whiskey fan, just add a teaspoon to your frosting before adding the milk. Either way, enjoy!

Saturday, 11 February 2012

Cupcakes Two Ways - Part Two

Hello again!

We're back with the thrilling conclusion of Cupcakes Two Ways! Our spine-tingling adventure started over here in part one, so be sure you've read that first. There's a lot of character development and drama and such in that first part, and, well, if you go and read this one first it's just going to spoil the whole thing.

So, if you've read part one, you know I'm a great big over-dramatic liar. There's that character development I mentioned.

Oh, and also I baked two kinds of cupcakes, and now it's time to frost and decorate them!

I am sorry this picture is so dark. Sometimes in the passion of baking, I forget where my light source is. Oops.

I am again sort of stealing from Bakerella - so poke this link here for her cream cheese frosting recipe. I only did a half recipe because by the time I was done baking the cupcakes, and my brother came by to visit, 4 un-decorated cupcakes had mysteriously disappeared. (The silver white cake only made 10 cupcakes, by the way, in case you're a stickler for math.)

In any case, I blitzed together the cream cheese and butter, above, then added my vanilla, below.


There's that spoon again! All together now: "D'aaaaaaaw!"

Yes, I'll get over the spoons eventually. Give me time.


Next, sift your icing sugar in a separate bowl to sort out any lumps, and add it bit by bit to your cream cheese mixture, blending all the way.


I must say, I was baffled when I first read this frosting recipe. Never, ever have I made a frosting that didn't include a liquid of any kind. No egg, no water, no milk, just fat, sugar and flavor. Part of me feared it wouldn't turn out well, but a much bigger part of me said to trust Bakerella.

And I'm so glad I did. This frosting, you guys. It is so good!

Next up, decorations! I hit my local bulk foods store and basically brought home anything and everything that I thought even might look decent on Valentine's Day cupcakes.


Clockwise from top left: Wilton sugar pearls, large heart sprinkles, pink sanding sugar, and tiny heart sprinkles. But oh, we're not done.


Clockwise from top left: Cinnamon hearts (oh goodness, my favourite!) sour gummy hearts, Valentine's Day Smarties (the chocolate kind) and regular gummy hearts.

It's fun time.


Friend Shanahan had suggested making a 'cloud' of frosting and popping two heart candies on top, I believe because when you're in love, your heart feels light as air. Or something.


Anyway it looked super cute! Now all I can think of is that Phil Collins song, what was it? "Two hearts, sitting on just one cupcake" or something like that.

But it was still missing something...


Tiny heart sprinkles fix everything.

Now, let me tell you, when I first sat down to sort through my photos for this post, I had over 80 pictures, just for the frosting & decorating step. I think I'm getting a little snap-happy with the camera. I eventually was able to cull all but my very favourite cupcakes to show you. This was very, very difficult to do, they were all so cute!


A simple spiral of cream cheese frosting piped on with a large star tip, with a simple pattern of Smarties over the top. I don't care what day of the year it is, more chocolate = more better!


Just one heart gummy atop a cupcake. It would be lonely if not for all the tiny heart sprinkles. Maybe I went a little sprinkle-happy, too.


On the silver white cake, since I still had quite a bit of frosting left, instead of making a new flavor, I just tinted the existing frosting pink. I do wish I'd had some kind of strawberry extract on hand because that would have been just extra special, but I didn't think of that at the bulk store. Next time.

So uh, there's a cupcake with pink cream cheese frosting and two sour gummy hearts. (See, berry flavor would have gone great with the gummies. Hindsight is 20/20, and all that.)


This one has a thick layer of pink cream cheese frosting with a simple pattern of sugar pearls and white heart sprinkles. I am probably ill-proportionately proud of it, but that's still not as proud as I was of this next one:


Anyone who's a big fan of Amanda over at I am Baker may notice a similarity here to her famous Rose Cake, and I freely admit it certainly took inspiration from her cake, though I hadn't read that post in ages. Reading it over again afterwards did give me some more ideas, though... but I'll be saving those for another day.

It should go without saying, but if you're not already reading I am Baker, Bakerella and Bakingdom, guys, you really should be. Fantastic blogs. Just don't compare mine to them because, well, I tried it and then I got kind of sad.

Know what cheers me up when I get sad?


Looking at pretty cupcakes. Awww, yeah.


I would definitely do this again. I highly recommend the 'buy every candy that looks good and throw it on cupcakes' method of decorating, especially if you have kids who want to help in the kitchen. Would also be super fun at a party, set out your icing and sprinkles and just let people go nuts.

I know they're not the fanciest cupcakes in the world but they were a tonne of fun to make - and even more fun to eat. Now the question is, how am I going to top these for V-Day itself?

You'll just have to keep an eye out for the next post to find out.

Until next time!