Showing posts with label royal icing. Show all posts

Thursday, 5 July 2012

Cookies for Bronycon

So right away, some of you are wondering, "What's a Bronycon?" Well, this article explains it better than I could, but in short, it's a convention for guys (and gals!) who like My Little Pony: Friendship is Magic.

Yes, you read that right.

And two of those bros who love ponies happen to be my husband and my brother. So when they vowed to attend the convention, I vowed to send along a treat for them and some of their favourite fellow fans. Now if you've ever watched My Little Pony - the classic 80's series, or the new one - or bought one of the toys, you probably remember that the ponies have little symbols on their flanks that represent their talent or true calling. They're called Cutie Marks, and I thought I could make them into some Cutie Cookies!


The first order of business was to bake 3" round sugar cookies and let them cool completely. Then I made some 20-second icing - which I have never done before! - and tinted portions of it in 8 different shades representing the coat colours of the mane six ponies plus a couple of favourite side characters.

Then I simply made a large circle of icing on 6 cookies in each colour and left them to firm up and dry completely overnight. The next day, I dyed some more 20-second icing in the ponies' complementing mane colours and made a pearl border around each icing circle.


This was a 2 (or more!) step process. First, I went in with the darker blue and did dots all the way around, leaving enough space between them for dots of similar size, then let them set at least 20 minutes. Once set, I went in with the secondary colour and filled in the gaps.


For one particular cookie design, whose corresponding pony has rainbow hair, this was a 7-step process! I really, really hope the recipients of these ones liked them because my goodness they were a lot of work!


For some cookies, I started the interior decoration while the first dots were still setting, for others I started once the borders were complete. Working on 8 designs at once, I kind of bounced around from one to the next as I hit upon the right colour combinations in my icing.

Can you tell what these are?


Maybe the stems being on there will help. They're 3 cute little apples. For some reason, these are one of my favourites of the designs!


Some of the Cutie Mark designs, like this triple-diamond mark, took several steps as well. I didn't get full how-to and process pics because I just had so much to get done, but you can see here that I started with light blue diamonds, let them set a while, then went back to add the slightly-darker-blue detailing.

When all was said and done, this set of 48 cookies took over 12 hours of work! But I think it was pretty much worth it. Just look at these finished cookies...


This cookie was undoubtedly the easiest of the bunch to make. It's not totally perfect, but I wub it just the same.


Honestly, a lot of hard work went into this cookie, and I think it deserves a blue ribbon. How do you like them apples?


I'm really happy with how this cookie turned out. It makes me want to smile, smile, smile! Seriously though, this is probably the closest I got to matching one of the mane six's cutie marks.


Let's see... soft violet background? Check. Purple and pink border? Check. Magenta star burst with white accent? Check aaaaand... check! Looks like that's everything we needed to make a Twilight Sparkle cutie mark cookie. Then again, maybe we should review the checklist one more time...


This one is based on one of my brother's favourites, Rarity, so I had to make sure it turned out absolutely fabulous. The border should have been 2 distinct shades of purple, but I couldn't get it quite right! Oh, of all the worst things that could happen, this is the. Worst. Possible. Thing!

... Okay, not really. But I do wish this had come out better.
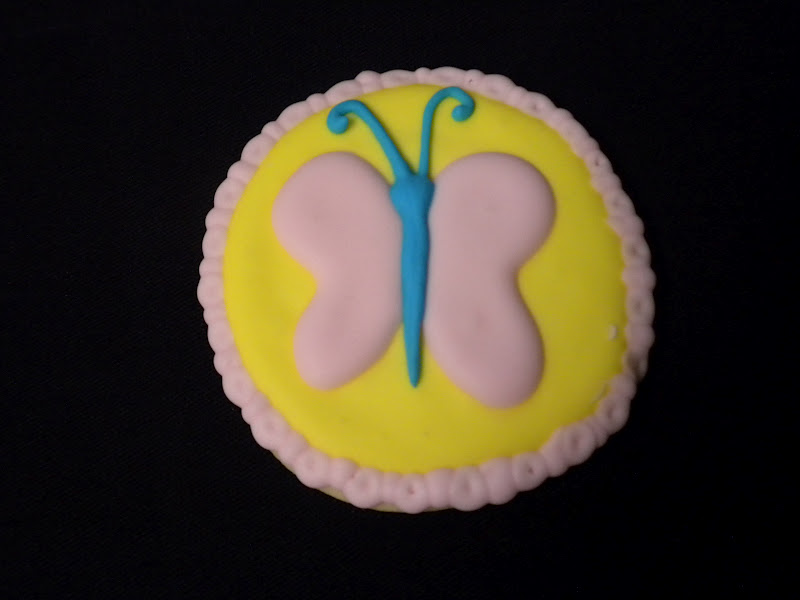

The cookies for Fluttershy didn't turn out as planned at all, there were supposed to be 3 butterflies for each cookie, but the pink icing got too runny and I foolishly tried to work with it anyway, so the wings all spread too much and the borders came out pitted. Oops...

Luckily, this one with just one butterfly turned out pretty well. Yaay! Oops, was that too loud? Sorry.


Here's another one, for a background pony who happens to be a fan favourite, but again I had trouble with the icing consistency and ended up with some pitting and running... I just don't know what went wrong!


I saved my favourite for last. This cookie represents the awesome Rainbow Dash. As I mentioned earlier, it took a lot of extra work to make this happen, but with that rainbow border it is at least 20% cooler than the others.


Altogether, I am pretty darn proud of these if I do say so myself. I think any pony fan could readily recognise who these represent.

Now if you'll excuse me, I'm actually just finishing up this post during my lunch break, so I simply must dash back to my desk. I have to make sure no-one's disturbed my pony collection that I brought in to show off today. The boys brought me back some cool trading cards and pins and...

Didn't I mention? Yeah, I'm totally a Brony too (or Pegasister if you want to be all gender-stereotypey) and now I want to make cookies for all the other background ponies, like Lyra and Bon-Bon and Carrot Top and Doctor Whooves and Mayor Mare and...

Oh, right! Back to work with me.

Until next time!

Tuesday, 15 May 2012

A Big THANK YOU! Also a Royal Icing Tutorial

So, I've been meaning to share with you all how to make the kind of royal icing I use for cookies like these, and these, and especially these, but there's something very important I have to say first:

THANK YOU ALL SO MUCH!

Thank you to everyone who clicked a link and came to say hi, thank you to everyone who liked the webcomic cookies or the flower pot cupcakes and decided to stay around, thank you to everyone who saw something they liked here and shared it with their friends and internet buddies.

Thank you, thank you, thank you!

I've been absolutely overwhelmed with the pageviews and feedback, and being featured in places like Comics Alliance and Webcomic Overlook and even the front page of a popular Cheezburger Network site! And how could I forget all the kind webcomic creators, artists and writers who shared my TCAF cookies post? (By the way, if you haven't looked at that post yet, and you have any love for comics at all, go look at it and click every dang link. You're welcome.) Of course, I must mention my super-supportive co-workers, friends, and family members who demand I bake on a regular basis. Y'all know who you are, and y'all know I love you!

I'm sure I'm missing someone, and whoever it is: thank you!

So, yeah, the English language is sorely lacking in ways to express gratitude, is what I'm finding here.

Thanks!

Now, to get back to sharing recipes and techniques: Royal icing!


A lot of people think that making royal icing is really hard. I was once one of those people. It's true that it can be a cruel mistress - too hot or humid out, and it may refuse to come together at all, a drop of fat in your bowl or stuck to your beater, and it may never stiffen.

So, uh, it's really not so much that it's hard to make, it's just that the correct conditions can be tough to achieve.

It's best not to make this on a hot, humid day. Make sure your beaters, bowl, spatula, and anything that will touch the icing is 100% clean. It's best to use glass or metal bowls and instruments since plastic tends to bond to fat and hold onto it more.

I, uh... I still used plastic. Gotta work with what you've got, you know.


So on the left, we have meringue powder and cream of tartar, and on the right, slightly warm water. I very precisely measured and weighed these ingredients, because another thing about royal icing is you need to follow the recipe pretty dang exactly.

Step one is simply to mix the meringue powder, cream of tartar and water together with a whisk, until foamy.


Like so. Then start adding your powdered sugar, a bit at a time until it's all in there, mixing all the while with your hand mixer (or if you're one of the lucky ones, your stand mixer) until the sugar is all incorporated.


Scrape the sides down with a spatula to make sure you don't miss any of the sugar. Once it's all combined, keep mixing for 5-7 minutes, until the icing becomes rather firm and loses some of its shine.


You'll know you're done if you pull your beaters out of the icing and they do something like this:


Those are stiff peaks, and the icing is hardly shiny at all. You're ready to add your favourite colours and start decorating your cookies! Have fun!

See? That wasn't really so hard. Though if, like me, you had to use a hand-mixer, you may need to massage your wrists a little. That's a marathon of mixing, isn't it?

If you want to try it out and decorate your own unique cookies, here's the recipe:

Royal Icing
Recipe & instructions adapted from McCall's School of Cake Decorating

40 g meringue powder
5 g cream of tartar
190 g warm water
1000 g icing sugar

Note: Yes, it's all in weights. You do need a decent kitchen scale for this, sorry. Due to the nature of the powdery ingredients, volumetric measurements just aren't good enough here.

Mix first 3 ingredients with hand whisk until foamy. Using stand or hand mixer on low, beat in sugar about a cup at a time until well-combined. Continue to beat for another 5-7 minutes on low or until icing is firm.

It's a good idea to cover your bowl with a damp cloth or towel and let it sit for 10-15 minutes before using, then give it a gentle stir with a spatula to remove any large air bubbles. Then you're good to go!

Be sure to keep any royal icing covered with a damp cloth while not using to keep it from going rock-hard when you don't want it to. To learn more about how I outline and fill cookies, refer to the Send-Off Cookies Post.

***

Thanks (yet again) for reading. I'll be sure to fill y'all in on what I baked up for my own Mom on Mother's Day later this week, so keep an eye out for that.

Until next time!

Sunday, 13 May 2012

Flowers for Mom: African Violet and Pansy Cookies

Now, I don't usually start with a shot of the finished product, because I'm a big fan of suspense, over here, but get an eyeful of these:


These cookies sprung initially from the mind of my coworker and pal Bonnie, who asked me to make cookies for her to give to her Mom on Mother's Day. At first it seemed a simple request, just, "Hey, do you think you can make cookies that look like flowers? Purple flowers? Like, pansies and violets?"

And I, in my incredible ignorance of all things flowers, replied, "Flower cookies? Sure! What could be simpler?"

Then Bonnie showed me some Google image results for pansies. 

Oh.

Pansies are actually kind of complex. Well, Bonnie, challenge accepted!


Despite my initial bravado, I actually decided to start with the violets as a warm-up. I couldn't find a simple 5-petal flower cutter (seriously, what the heck?) so I started with a round cutter and made notches for the spots in-between the petals.


Admittedly, this was not the look I was going for. The petals came out more square than I had intended. I need to go on a serious flower-shaped-cookie-cutter shopping spree.

But in the meantime, I had to make these look something like violets.


I piped onto the somewhat-misshaped cookies a better approximation of the violets' outline and filled with flood icing in - you guessed it - a shade of violet. Real violets are not flat, of course, so to try to give the illusion of the center being recessed, I added a spot of darker purple flood icing in the middle while it was still wet.

After the flood icing had set up for 15-20 minutes, I went back and added the lines on top for a bit of petal definition and three dots of yellow icing to each for the stamen.


Et voila, Viola, vive le violets! (Apologies, an avid aficionado of alliteration.)

Now, before I start showing you the pansies, have you ever seen a pansy? I mean, and really looked at it? Tell me, have ever really, really really ever seen a pansy?

They're bizarrely asymmetrical. They look like they have evil little faces. Look at them staring into your souls with their eyes of pure darkness and gaping mouths!

Okay, so I'm being a wee smidge dramatic here, but come on. I was pretty intimidated about making those into cookies!


I again started with a simple round cookie cutter, and trimmed bits away until I had the general shape.


Then, using a smaller circle cutter, I cut half-moons to add on as those weird additional layered petals pansies seem to have on one side (freaky, I tell you.)


If you looked at the sample pics of pansies, you may have noticed many varieties are multicoloured. Bonnie was really going for an all-purple assortment but I weaselled her into letting me do some white & purple pansies for variety.

So, as you can see above, I outlined the white petal sections in white, and the purple in purple. Pretty straightforward so far.


Fill in with thinned royal icing to match the outline, then, while it is still wet, add a yellow blob of flood icing for the center, and contrasting highlights to some or all of the petals.

Sorry for the cookie switch out, folks, took photos of different cookies at different stages. You know how it is.

Once you have your contrasting colours down, take a toothpick, and using quick strokes pulling from the center out, and then from the highlight colours inwards, work the icing until...

Well, until it looks like a pansy! It's hard to explain, really, I just kind of fiddled with it until I got this:


So basically, if your cookie looks a little like it has a streaky smiling monster face on it, you're on the right track.

For some of these, the yellow centers got a little too muddy with all the streaking. If that happens, just blob on a tiny bit more yellow icing while it's still wet.


The technique is pretty simple once you get the basic shape and look of the pansies down, which I'll admit, took a couple of tries. Luckily, I always make a few extras for just such practice, and there's always someone happy to help hide the evidence when mistakes are made.

But a bit of practice and perseverance, and...


Practically perfect pretty pansies, plus they're palette-pleasing! (Sorry, I just can't help myself.) 


I really hope these go over well. I know if I were a mom, I'd be pretty touched to get my favourite flowers in food form. All credit for that thoughtfulness of course goes to Bonnie!

Now if you'll excuse me, I need to go prep to make my Mom's very favourite coffee cake for brunch in the morning. If all goes well, I'll let you guys in on it.

Until next time!

Sunday, 8 April 2012

Easter Egg Confetti Cake!

Hello and Happy Easter everyone! However you celebrate this holiday, I want to wish you and yours all the best.

I also want to show you this cake that I totally winged all the way through.

I have never made a confetti cake from scratch before. I kind of thought it was the sort of thing you could only do with a mix. Gosh, I'm silly. Sweetapolita proves how ridiculously easy it is to make over on her blog. I'm stubborn and wanted to do things my way, though, so I started with my favourite white cake recipe, the same silver white cake I used for these white cupcakes...


... and instead of adding the recommended 1/2 cup of rainbow jimmies, I chose Easter/spring-coloured ones.


... And then I added way more than half a cup!


They just looked so pretty while I was pouring them, I just kept going! But, hey, you can never have enough sprinkles, right?


Gently fold the sprinkles into your batter until well distributed, like so.


Then prep your pans! Or, if you plan ahead, unlike myself, you will have done this already. As you may have noticed, I have special silicone baking molds for this cake! These were a gift from my mother, she gave them to me with a free additional gift of heavy-handed hinting at what I should bring to Easter dinner. Subtle.

In any case, though I am usually a proponent of the grease & flour pan preparation method, I used cooking spray here because I was worried about too much shortening or flour building up in all those nooks and crannies.


The directions said to fill the pans half-full and bake as if they were layer cakes. The directions lied. I baked these babies for 30 minutes, as if it was layers, and they came out jiggling.


I had to let them go another 20 minutes before they were done enough! And by then the outside was a bit too crisp. I wonder if I`ll ever have success with shaped cake pans.


Worse, when I turned them out of the pans, the one on the right stuck and sort of fell apart. I don't know if I tried to de-pan them while they were still too hot, if my cooking spray was just made of fail, or if my over-zealous sprinkle additions simply caused the cake's surface to become sugary-sticky.

Most likely, it was a combination of the three. Learn from my mistakes, folks! Use good quality cooking spray, measure your sprinkles properly and let the cakes cool a bit before taking them out of the pan. Hopefully, that will prevent this same cake-tastrophy from befalling you.

I didn't let this setback stop me for long, however. Oh no, I'm much to stubborn to be stopped by a bit of crumbled cake.


Once I'd trimmed the cakes to be as level as possible, I set right to it with simple syrup and worked to 'glue' the cake back together. First I mended the broken stuck-in-the-pan bits back onto the main cake as best I could.


Then I spread a generous, and I mean generous, amount of simple syrup on the flat, cut sides of the layers. I carefully put the broken-ish half atop the whole one, cut sides together, of course, wrapped the whole thing in plastic wrap and stuck it in the freezer overnight.


Though it certainly didn't get any prettier overnight, it sure did solidify into one pretty stable cake. Even the loose bits cemented on pretty well. I let it thaw a tad while I got the coating ready...


That's one pound of Merken's light chocolate coating. My original plan was actually to do a glaze on this cake, but when I saw how much the (excessive) sprinkles' colours showed through the cake, I knew that it would be difficult to mask it with glaze.

So chocolaty coating it is!


I slopped a good blob of coating on the cake over a wire rack, then shook the dickens out of it until the chocolate formed a pretty even coat. I used a spatula to smooth the stray drips along the sides and placed it in the fridge to set up.


Once the coating was set - which didn't take long at all, maybe 10 minutes, if that - I flipped it over and poured the rest of the coating over the other side. After semi-vigorous shaking, it settled into all the right grooves. I cleaned up the edges and underside a bit with a spatula once more. You can clearly see the patterning from the cake mold, but the coating is thick & dark enough to hid the confetti surprise inside.


Once it set up in the fridge again, the whole cake was encased in nice solid chocolate coating, and by gum, it looks just like a giant novelty chocolate Easter egg! Am I ever glad I didn't go with that glaze.

Now, you could just stop here and have a fantastic chocolate-coated, confetti surprise cake, but I wanted to go a tiny step further.


See, I still had colourful royal icing left over from the baby shower and Easter cookies, and I kept thinking back to when I was a little kid, and the neatest part about Easter was getting a big hollow chocolate egg with my name written on it in hard, sweet icing, often with a pretty flower or two.

So, you can probably see where this is going.


The zigzag is simply the pink icing piped on with a petal tip, the blue stars piped on with a star tip, and the little flowers are the easiest icing flowers in existence - drop flowers. Maybe I'll talk more about them someday.

At the moment, though, I have stayed up way too late - again! - and really ought to catch some sleep before it's time for Easter Sunday brunch with the family. Of course, what I'm looking forward to is after Easter dinner, when I can cut into this baby and find out first-hand how successful this endeavour has been!

I'll be sure to let y'all know how it goes. In the meantime, have a fantastic Easter everyone!

Until next time!

Update:


In case anyone wanted to see what it looked like sliced up & served:


Yeah, that one big dot kind of slid off the side overnight... I really should have let it set up longer, but I can be pretty impatient sometimes, especially when we're talking about chocolate-covered cake. Can you blame me?


This is a cake best served with a nice dollop of ice cream on top. I think if I do this cake again, I may substitute a thin coat of raspberry filling in place of the simple syrup. It held together pretty well, but... Well, as I've said before, I'm not a big fan of white cake, and I found the flavor a little lacking.

What a super fun project though! Would definitely make it again, and I'd suggest giving it a try yourself, too.

Not sure what's next for the blog now that Easter's passed, but rest assured, there will be something new within a week or so, so stay tuned!