Friday, 10 February 2012

Cupcakes Two Ways - Part 1

I still haven't decided what I'm baking for my hubby this Valentine's Day, but I've been batting ideas around.

In the meantime, I made some Valentine-themed cupcakes! I took way too many pictures, as always, so this post will cover the baking part step-by-step, then I'll post about the decorating in the next few days.

So to start with, I dug another recipe out of Great Grandma's crumbling old cookbook. It was one I hadn't made in a while - as I mentioned before, I'm not a big fan of white cake, and this is the whitest white cake I know!

Recipe for Silver White Cake
For all of you who can't read that somewhat blurry mess, the recipe, as I made it, is:

Silver White Cake

2 cups all purpose flour
1 1/2 cups sugar
3 1/2 teaspoons baking powder
1 teaspoon salt
1/2 cup shortening
1 cup milk
1 teaspoon vanilla
4 egg whites

Preheat oven to 350 degrees, grease and flour your baking pan as we have discussed previously, and start getting your ingredients together.

About those pans: I did grease & flour two 9" round pans because I am making 2 batches of cake batter, and only want 20-24 cupcakes, so I'm also going to bake layers and freeze them for a later use.

If you aren't doing this, just pop some cupcake liners into your muffin pan and go to town.


Reason one why I prefer yellow cakes - you don't have to separate the eggs! The actual separating isn't too hard, I just... I really don't like touching eggs and risking getting them everywhere.

So I just crack an egg as neatly as possible - on a flat surface, mind you. Cracking it on the edge of a bowl or pan may cause the shell to puncture into the egg and break your yolks, and then all is lost.

In any case, separate your eggs into a couple of bowls. Pass the yolk carefully back and forth between the 2 sides of the shell, letting the white fall into the bowl, then dump the yolk into another bowl. The smart thing to do is to transfer each egg white into yet another container before you start the next egg, this is so if you do break a yolk, you won't contaminate the whole batch.

I did not do the smart thing, but luckily the one yolk I did drop miraculously did not bust and I was able to fish it out.

An even easier way to separate your eggs is to actually drop the yolk into your cupped hand and let the white fall through your fingers into the bowl. I did not do this, because it feels incredibly gross. But it does work. I've done it before, then I had to scrub my hands raw to get rid of the lingering feeling of salmonella. (Does salmonella have a feeling? No? Well, it does now.)

But I digress!

Once your eggs are separated, dispose of the yolks (or save them for an omelette or a lemon curd or something) and start measuring out your ingredients.


Measure all the ingredients out into your bowl, except the egg whites and 1/3 cup of milk.

Admire your incredibly cute teaspoon measure as you pour the vanilla.


These sweet babies were a Christmas gift from a dear friend - no, not the one who just had a birthday, but one I've known even longer and - okay, I'm just giving them names right now. The friend who had the birthday shall hitherto and onwards be known as "Shanahan" because though that is not her name, it is what I always call her. She may or may not share a birthday with a famous sports dude.

Awesome friend who gave me these measuring spoons for Christmas (along with the sweetest little fondue set, but I don't want to get too off-topic) shall henceforth be known as "Kit." So with that said and done, did you see how the handles on these are little cupcakes?? And that there's little cupcakes engraved in each spoon? I didn't get a good picture of it, but see how on the fronts, the spoon stems say the measurements? On the backs, there are the cutest little hearts! I almost felt bad getting these dirty.

They are definitely the #1 cutest baking accessory I have. So, thank you Kit!!

Now, where were we? Oh, right, cake!


So now that you've got all the ingredients in the bowl - except for the 1/3 cup milk and the egg whites, which are keeping each other company elsewhere on the counter - mix on low speed for about 30 seconds just to get it incorporated, then blitz it up on high for 2 minutes. Scrape down the sides of the bowl with a spatula frequently during all this mixing so you don't end up with random unmixed chunks. It will look quite thick and a bit fluffy when you're done.


Then we can invite the rest of the milk and the egg whites to the party, scrape down the sides of the bowl, and give it another 2 minutes on high speed.


Mmm, smooth, sweet, and oh-so-pale. This batter is ready for baking!


I found these adorable cupcake cups at - of all places - Dollarama! I couldn't believe I could get cupcake cups this pretty for so cheap. I'm not usually one of those girls who squeals for pink and frills, but I guess thinking about Valentine's Day does that to me.


I used an ice cream scoop to measure out the batter, but I accidentally overfilled some of the cups this way, so uh, don't do that.


I didn't forget about my layer cakes - I made sure about half the batter made it into the round pan.

Next up, like the title says, this is cupcakes 2 ways, so I thought I'd try a recipe I keep seeing around the interwebs - Red Velvet. Now, red velvet originated in the Southern States, and only recently has it become popular elsewhere. Your average Joe here in Ontario, Canada, still has never heard of it - unless they're the type that reads baking blogs and sites with American content. Or watches cake shows.

Moving right along. Bakerella recently did a wonderful Valentine's Day cupcakes post, where she made cupcakes that had little Cupid's arrows through them. They were seriously too cute! Check out the recipe and her Cupid's Arrow design here.

I didn't have the resources to do that kind of decorating, but I wanted to try out her recipe, so here goes!


This is our wet ingredients - eggs, buttermilk, vinegar, oil (a whole cup of oil! Dang) and eggs.


And oh yes, red food colouring! The recipe called for 1-2 ounces of the stuff. I've made red velvet cake precisely once before, from a different recipe, and used all 2 ounces of the colouring. It was bitter with the taste of the food dye. This time, I used about 1 1/4 bottles, and as you'll see, it still came out vibrant red!

In a separate bowl, whisk up all your dry ingredients and then pour the wet into the dry.


Uh... I might have put the dry ingredients into a smaller bowl. I was doing all kinds of not-so-smart things this day! I debated pouring the dry into the wet, but worried it might cause some kind of nuclear apocalypse, so I just dealt with the smaller bowl and poured the wet ingredients into the dry. It just fit into the bowl with enough room to mix!


Oh, look at that rich, shiny, satiny, red batter. I wish this image was large enough to be my computer background.


For the red velvet cupcakes, I went with plain white cupcake liners, and used 2 smaller scoops of batter to fill each cup, to try to avoid the overfilling issue I had with the silver white cake.


Again, I didn't forget about the layer cakes! They baked after the white cupcakes, and before the red ones. After letting them cool for a few hours, I wrapped them up in plastic wrap, then aluminum foil, and put them in the freezer.

Still debating what I'm going to do with them....


The silver white cupcakes came out a little flat... I don't know why exactly, I'll have to experiment with ways to make them rise more nicely. The red velvet looked absolutely perfect. Now all I had to do was think of a worthy way to decorate them.

But instead, I put them away and went to sleep. Which is also what I'm going to go do now! This post has been a bit of a marathon already, so stay tuned for part two, our thrilling conclusion of Cupcakes Two Ways.

Well, I mean, as thrilling as reading about me frosting cupcakes can be.

Until then!

Monday, 6 February 2012

Experiments in Sugar Cookies

Valentine's Day is only 8 days away, people!

And whether you're spending it with your sweetie or revelling in the freedom of singlehood, who doesn't love a cookie? I love a cookie. I love lots of cookies.

I decided to start my Valentine baking with some sugar cookies. I happened to have some dough hanging out in the freezer already so I just let that thaw in the fridge overnight and got rollin'.


You could use store-bought dough or whatever sugar cookie recipe you like here.

I have a ridiculous amount of cookie cutters. Double hearts, big hearts, small hearts, hearts-with-arrows-through-them, triangles, tennis racquets, school buses, and on and on. Not that tennis racquets and school buses have much to do with Valentine's Day, but uh, I have a lot of cookie cutters.


In any case, I wanted to just experiment with simple shapes this time around so I picked out a 3-inch cutter, a 2-inch, and a tiny little 1-inch cutter all in heart shapes, and played around to see what I could do with them.


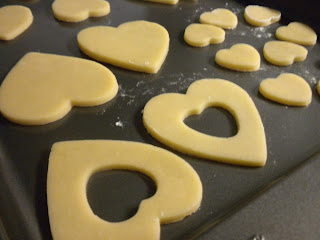
I overlapped some large and medium cookie shapes to make double hearts. After pulling up the dough of the larger heart, I cut out another smaller one and nestled it into the outline left by the smaller cutter. I kind of wish I'd taken more photos of that because it's hard to put it into words properly.

Darn it, Jim, I'm a baker, not a wordsmith!


Once all my shapes were cut I laid them out on my cookie sheet. It's best to use parchment paper here, if you have it, for easy cookie removal and clean-up. I, however, ran out and forgot to by more, so naked pans it is.


When I was first cutting these out I wasn't sure what I was going to do with them, but as they baked I remembered a conversation I'd had with a coworker, Deon. I was mentioning that I was working on some new cookie recipes and he interjected, "You should make cookies with JAM in them!"

So now you know where this is going.


I got some super-fancy little jars of jam for Christmas and was saving them for just such an occasion. I put a dollop of jam in a little glass bowl and let it sit on the hot oven to warm a bit so I could spread it nice and thin. (You could microwave it if you want but hey, the hot oven was right there.)


Once you've got a nice thin layer of jam - or a bit thicker if you're a big jam fan - simply pop the cookie with the cutout centre on top.


Just for the sake of fanciness I dusted them with a bit of powdered sugar. I have more cookies to show you, that frankly took much more effort, but you know what? These little jam-filled guys are my favourite. So simple, elegant and oh-my-god-I-can't-believe-it's-this-delicious! Hubby and I devoured them straight away.

So, Deon, if you ever read this: awesome idea, dude. Awesome.

Speaking of ideas, I always thought those little message heart candies were so, so cute, but also so, so unpleasant to eat. Chalky texture, you know. So I thought, why not make tiny message heart cookies?


So I did. These are the itty-bitty 1-inch heart cookies. I outlined the hearts with tinted royal icing, then thinned the rest of the icing and pooled it in the center of each cookie, using a toothpick to spread it out to the edges.

I was going to take some cool in-process photos of that so you could all try it, too, but you know what? The camera died and had to recharge. I couldn't leave the icing sitting out while I waited so I had to just go ahead without pictures.

There's always next time.


Just so you can see how tiny these are! It was very difficult to fit the messages on them, let me tell you! I used a #2 round icing tip for the lettering.


The 2-inch cookies were just big enough to fit a short, sweet name on them. These aren't anyone I know, just names I like. A couple of them might be names of characters from things I watch and read. Maybe.


The 3-inch cookies gave ample room for more detailed messages. These are all pretty cliché but I was just kind of playing around and practising my icing penmanship, which as you may notice, can still use some work.

If you want to be snarky, these are also just the right size for messages like "V-Day Sucks" or "I Love Me" or whatever.


Getting back into more romantic messages, when I looked at my baked double heart cookies I suddenly thought of all those cliché movie and TV scenes where they carve their initials into trees or fences with hearts, so after flooding them with classic Valentine's Day colours, I threw on some initials.

I really like these. I think they'd be cute for engagement parties or anniversaries, and not just for V-Day. 

But nothing tops those ones with the jam. It's tempting to go into the kitchen right now and make another batch! I'll resist though, because I promised someone there'd be cupcakes this week. So brace yourselves - cupcakes are coming!

Until next time!

Saturday, 4 February 2012

Crafted in Fine Marble, Part Two: The Frostening

Hello again. If you haven't yet checked out my Crafted in Fine Marble post, please go do so now! This post will still be here when you get back.

...

Okay? You've read it? Okay great. So, now that the cakes are marbled, baked and thoroughly cooled, it is time to frost 'em up! By the way, I do mean thoroughly cooled. If these babies are the least bit warm the frosting is going to slide right off them. My cakes spent the night in the fridge so they were more than ready to go.

The bad news is I slept in that day - I was still fighting off that awful cold - and I didn't have a ton of time to decorate before people started arriving. I'm sorry to say I did rush these a bit.

I trimmed the top to be as level as possible, then set to decorating. The first challenge I had was figuring out a way to frost the bottom of the giant cupcake cake. Trying to slather it on with an offset spatula like a regular cake did not work at all. I eventually settled on using a large petal tip - one that was approximately the size of each ridge on the cupcake - and proceeded to ice like so:


So, two things I should have done differently: I should have waited until the sides were done before frosting the top. My concern was that frosting the top afterwards would mess up the sides, but doing it first meant the frosting firmed up too much before I put the top on.

Thing two, because I was rushing a bit, I wasn't totally consistent in my technique. The ridges in the above pic are pretty even, but around the rest of the cake I started getting a bit sloppy. The 'fat' part of the petal tip should always align with the raised part of the ridge so as not to accidentally fill in the gap and ruin the ridged effect. I, uh, I might have done that in a couple of spots.

Live & learn!


So once I had the bottom frosted all around, I plopped the trimmed top bit in place and realised my other mistake. I really should have tinted that middle frosting to match the top or bottom of the cake. Oops again. I did what I could to mask the white showing through.

By the way, I swear on all that is sugary that someday I am going to buy a microwave stand, and you'll know when it happens because my pictures will suddenly, magically be uncluttered!

I'm not kidding when I say I'm a Baker in the Basement, you guys, and my kitchen counter space is exceedingly limited, but you just watch. The day of the microwave stand will come.

Uh... sorry, got a little off-track there. Back to the cake!


Using a large round decorating tip, I followed the natural swirl of the cupcake top and tried to get as even a layer as I could. If it's not perfect at this point fret not.

Although, you can fret just a little if, like mine, your clock shows that guest will be arriving soon and you haven't even started decorating the second cake. Eep.


So the reason you don't have to be perfect with the first pass of top frosting is because you're going to smoosh it with a spoon a bit to even it out anyway. I wanted it to look like someone had smeared the frosting on with a giant spatula.


I think it turned out pretty okay for my very first giant cupcake! Anyone who follows my Twitter account (Follow over here, if you're interested!) probably saw me say there would be giant fondant sprinkles on this. And there would have been, except my white fondant apparently was not packaged as air-tightly as I'd thought, and it sort of dried out. And by 'sort of dried out' I mean was completely as hard as a rock. So silver dragées became the main decoration instead.

This worked out since my buddy is a big Doctor Who fan, and the Tenth Doctor once ranted about how fascinating these 'edible ball bearings' were. So she appreciated them on her cake.

Speaking of fandoms, my dear brother Duck is a great big fan of the new My Little Pony series, so I endeavoured to depict one of his favourite characters on his cake. I missed progress shots of doing the basic frosting, but I just slathered on chocolate frosting as you would for any old layer cake, and then made a rough outline of the character in the still-wet frosting with a toothpick.

Once that was done I started piping the outlines in coloured vanilla frosting, and filling with the same frosting, but thinned out a bit.


Anyone very familiar with the show should - hopefully - get an idea of who this may be already. In future, I'm going to either thin the filling frosting more, or try out frozen buttercream transferring, but that takes ages and I was on quite the tight deadline by this point, so I forged on.


I had a small amount of not-hard-as-rock red fondant that I used for the pupils, everything else here is plain ol' frosting. I did his eye highlights with just a bit of white icing on a toothpick.


Filled in all the different areas with that slightly-thinned frosting...


Until his full face emerged! This, for those who don't watch Saturday morning cartoons aimed primarily at little girls and their families, is Discord, spirit of chaos, the main villain for the first couple of episodes of the second season.


Being spirit of chaos and disharmony, I wrapped his design down the sides of the cake, because Discord has no respect for your ideas of proper cake design. Here, you see his neck, mane, and horns poking down into the lower border.

Speaking of that border, I should have known putting a Lord of Chaos on a cake wouldn't go smoothly, I wanted that border to be done with a pretty star tip. So I fitted the tip to my trusty frosting bag and squeezed to remove air pockets -


And the bag exploded everywhere! It was my last frosting bag, too, so I had no choice but to jam the rest of the chocolate frosting in a regular freezer bag, snip the tip, and squeeze on a plain border.

Discord, spirit of Chaos, everybody! Jerk.


The good news is, bland border or no, Duck loved his cake. And when we sliced into these babies, mmmmm. 


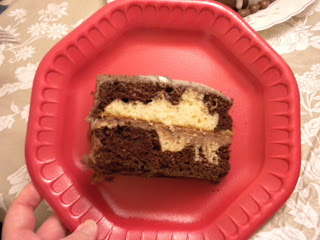
Chocolately, buttery swirls of goodness!


I wish the marbling came out just a little prettier here. I think next time I'll go with smaller blobs of batter in that first marbling step to get a finer result.


Inside the giant cupcake, though, the marbling turned out absolutely gorgeous. I couldn't be prouder of the inside of this cake! (The outside, well, I learned a lot for next time!)


And there you have it, two marbled, baked, cooled, trimmed, frosted & decorated birthday cakes, one group of full & happy birthday party-goers, and one very tired baker.

Thanks for reading, and stay tuned, I've got some Valentine's sweets planned for very, very soon!

Until next time!

Thursday, 2 February 2012

Crafted in Fine Marble

... Cake. Fine marble cake.

In that I made some marble cakes and they turned out just fine. I made a giant cupcake for a dear friend (I haven't yet figured out which of her many nicknames I should refer to her as, so she remains 'dear friend' for now, heh) and a regular layer cake for my brother with a special frosting design, and we had a little double-birthday get-together to share them with everyone.

Pretty swirls of chocolate and vanilla are easier to achieve than you might think!
As we cut and served the cakes, people kept asking:

"How did you marble them like that?"
"How did you make these pretty swirls?"
"How did you keep it all from just turning beige?"

And I had to laugh. And maybe it was rude of me to laugh but you have to understand - it is the easiest thing ever. Anyone can do it! I will show you.

Start with your favourite white - or yellow like I've used here, since I prefer yellow cakes in general - cake batter, and a separately prepared bowl of chocolate cake batter.

Bonnie Butter Cake Batter

Black Midnight Cake Batter
I'm obsessed with making things from scratch so these are from the ol' family recipe collection, but you could use cake mix or whatever recipe you like.

Prepare your pans. I often go the fast & easy way and just use non-stick pan spray, but I find more and more that I end up with hard, crunchy cake edges that sort of shrink away from the sides of the pan. If anyone's seen the Reese Cake post, you may also notice things often still stick to the pan. These were special occasion cakes I was making, so I took the extra precaution of greasing & flouring them.

It takes a little longer, and it makes a bit of a mess, but I was hoping it would be worth it when it came time to de-pan the cakes. So, I took a paper towel smeared with Crisco and rubbed it all over the pans, then dropped a couple of tablespoons of flour into the first layer pan.


I held it over the next layer pan as I rotated and tapped and shook the pan about to get the flour all over. You'll and up with a thin coating in some places and chunks of flour in others, but that's okay! Once there's no shortening-coated pan left unfloured, turn it upside down over the other pan and give it a couple smacks.


Voila. A thin coating of flour over your pan. Repeat for the other pan, but when you give that one its final smack, hold it over the garbage, or a large bowl if you wish to reserve the flour because you're making more than one cake.

I was, of course, making two cakes so I tried to tap the excess flour off into the giant cupcake pan, but, well, that's where the 'bit of a mess' part comes in. I had to wipe up a lot of spattered flour when I was all done, let me tell you.


Getting the flour all over the inside of the greased cupcake pan, and NOT getting it all over my kitchen proved  a task simply too great for me. Next time maybe I'll do it over my largest sheet pan to avoid another flour-pocalypse.


Once your pans are all floured, it is marblin' time! (That sounds like a really, really lame super hero battle cry. I'm going to use that now.)

So, take about a quarter of your yellow cake batter and plop it into the pan at random-ish intervals. You don't want a smooth layer of cake batter here - you want random blobby clumps. Then just plop some chocolate cake batter down between and over them.


Like so. If it looks like a blobby, uneven mess, you're doing it right!


Now take a small spoon and gently swirl it through the batter, round & round and back and forth until the batters look, well, marbled. You want to avoid hitting or scraping the sides & bottom of the pan or you'll mess up the flour layer, and try no to over-swirl it or it really will turn beige!

Once it looks swirly, use your spoon or a spatula to smooth the top out.


At this point, I worried ever-so-slightly that I had ruined the marbling, but only the very top was covered in a chocolate layer, the lower bits were still marbled nicely. Repeat this process for the other layer. I personally switched it up and put the chocolate batter blobs in first this time.


After swirling & smoothing, the marbling still showed through the top. I'll probably do it like this from now on.


I repeated the whole process for the giant cupcake. The only difference was that, because this pan was so deep, I had to put a few blobs of each batter, marble it, then put more on top and carefully marble that. If I'd put all the batter in at once, I don't think I would have been able to marble them without completely destroying the flour coating.


Then I followed the recipes' baking directions for layer cakes, and they came out gorgeous!


So swirly! At first I thought my giant cupcake had come out perfect too...


Swirly! Gorgeous! Jiggly! ... Wait, jiggly??

Aw, nuts! The depth of this pan not only complicated marbling, it complicated baking! The 'top' portion of the cupcake cake was actually perfectly baked, but the 'bottom' bit was still mostly liquid in the middle! I had to extremely, extremely carefully tip the pan to extract the cupcake top while trying to keep the bottom in place.

I managed to get the top half out to cool, then turned the temp down 25 degrees on the oven and baked the bottom for another 20 minutes. Oy.

Moving on.


Why am I showing you this kind of uninteresting cake bottom shot? I mean, it's just a smooth, slightly floury cake bottom.

That didn't stick to the pan. That popped out perfectly when I flipped it over. That's why! The shortening & flouring mess is now justified! All the cakes popped easily out of their pans with a gentle shake & tap. Amazing.


When the bottom was finally baked I set it out to cool... and noticed I had definitely dented it when I took out the other half of the cake earlier. Well, nothing a little trimming can't cure.

I'm actually going to call this post done for now since I really just wanted to talk about the marbling and oh my goodness this got way longer than I meant it to! So thank you for slogging through this long post, and keep an eye out for part two where I actually put some frosting on these things and serve 'em up!

Until then!